

Classification Brains
Defining a Region of Interest (Optional)
Classification Brains normally analyze the entire image. A Region of Interest (ROI) allows the Brain to focus on a specific rectangular area of the image. Anything outside the selected ROI is ignored by the Brain.
The option to use an ROI is selected when creating the Brain. If you select Yes under Region of Interest, the Add Region of Interest page opens before the Capture page. If you select No, the Edge Training and Inference Tool opens the Capture page directly.
When to Use an ROI
Use an ROI when the relevant area remains in approximately the same location across all images.
An ROI may be useful when:
- The Brain needs to analyze a particular component on a circuit board.
- A wide-angle image shows several manufacturing steps, but only one area is relevant.
- The camera view includes changing background details that are not relevant to the prediction.
- The object or feature being classified consistently appears within a specific part of the camera view.
For best results, keep the camera and inspected object in consistent positions so that the relevant area remains inside the ROI.
Defining the ROI
To define the ROI:
- Position the object in front of the camera.
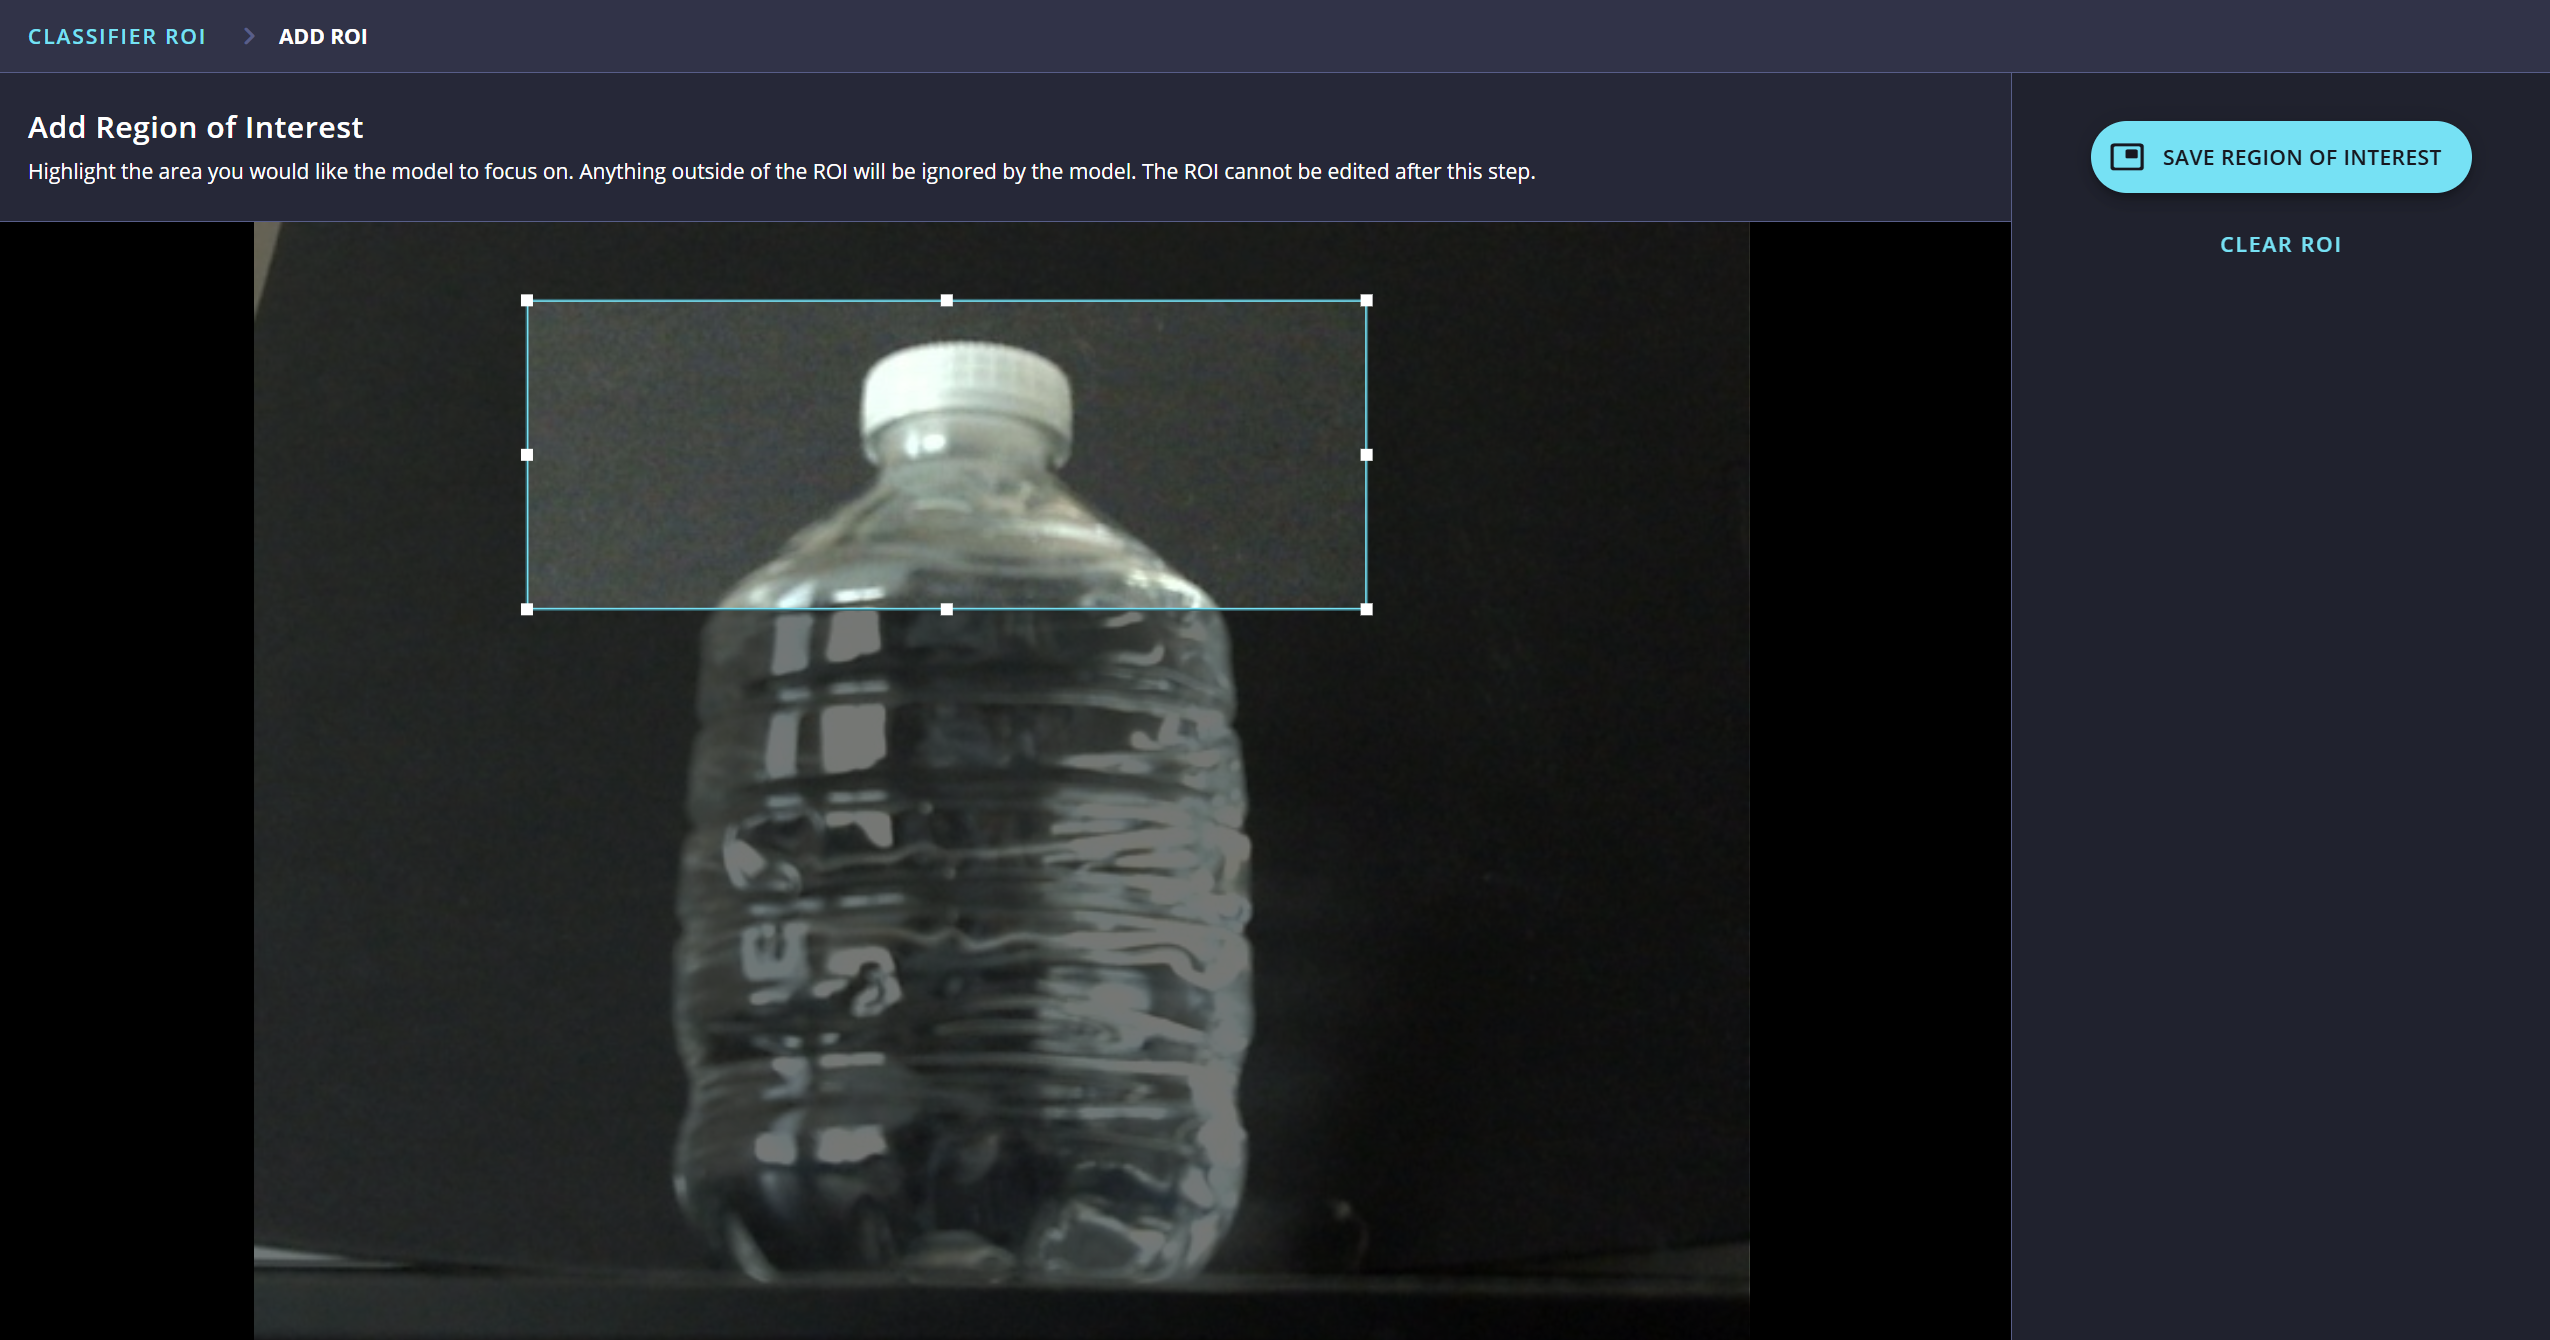
- On the Add Region of Interest page, draw a rectangle around the area the Brain should analyze.
- Adjust the ROI until it contains the entire relevant area.
- To remove the current selection and start again, click CLEAR ROI.
- Carefully review the selected area.
- Click SAVE REGION OF INTEREST.
Important: The ROI cannot be edited after it is saved. Make sure it includes the complete area that the Brain needs to analyze before continuing.
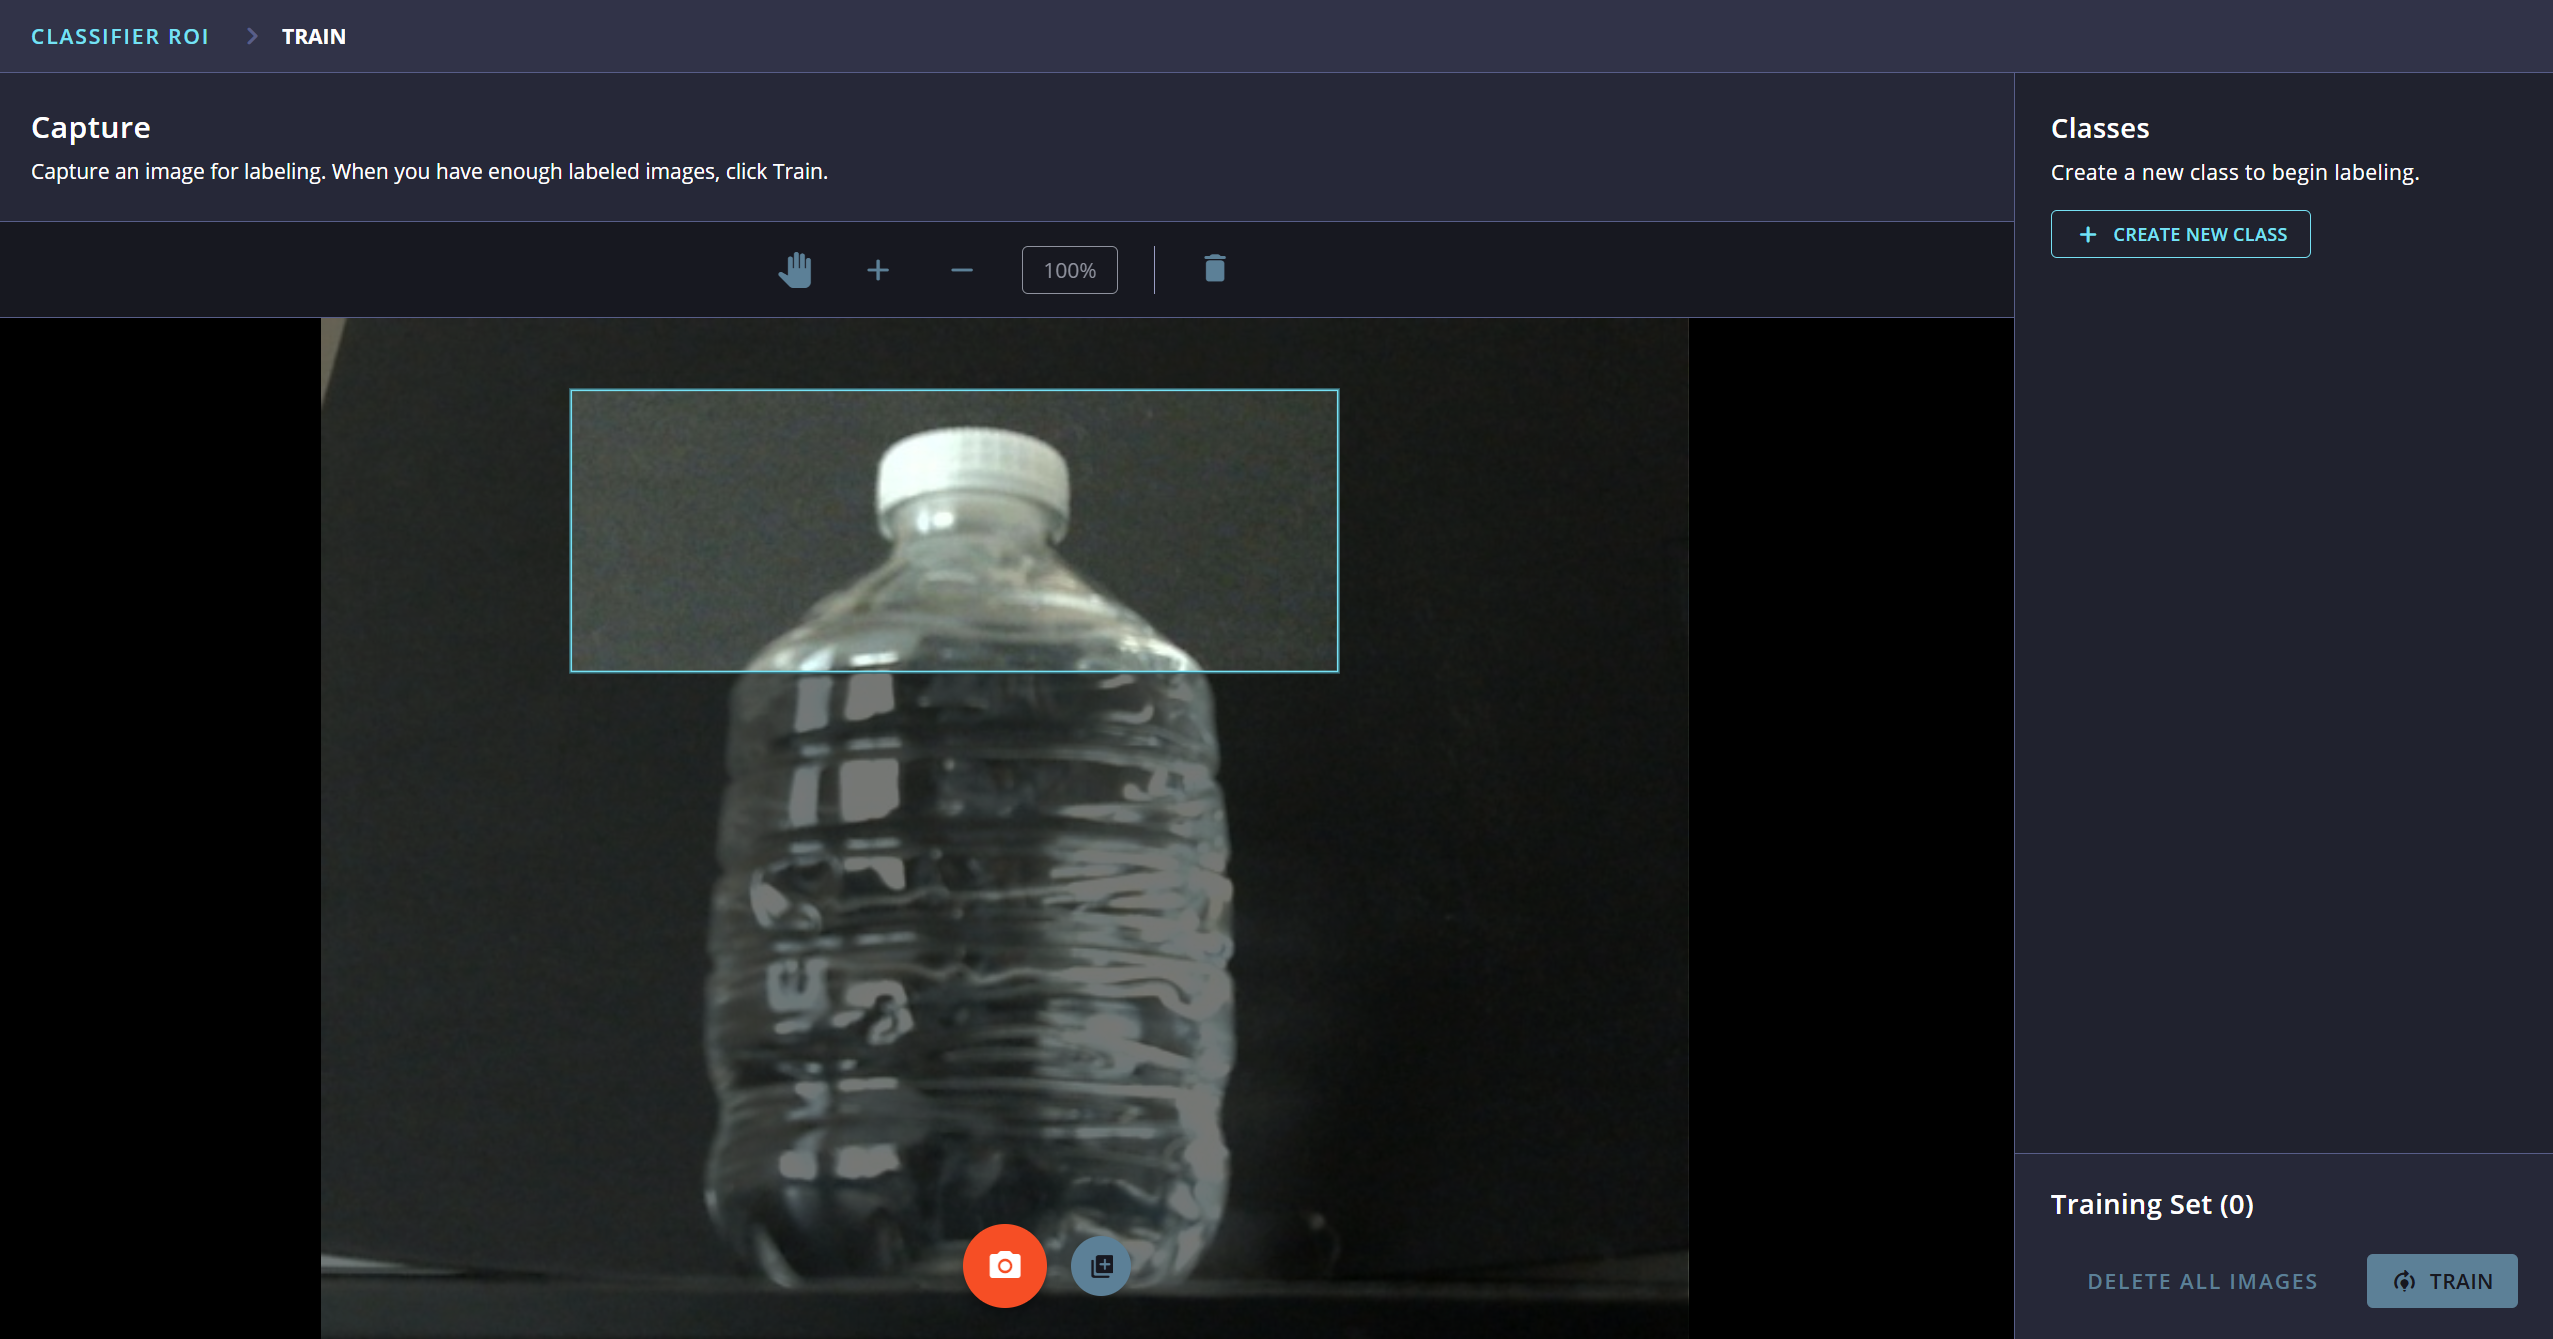
After the ROI is saved, the Edge Training and Inference Tool opens the Capture page. The ROI remains visible in the camera preview while capturing training images.
When positioning objects for capture, make sure the relevant features remain inside the ROI.
Capturing Images and Creating Classes
After creating a Classification Brain, the Edge Training and Inference Tool opens the Capture page. Before collecting training images, you must create at least one class.
Creating Classes
A class identifies the category to which a captured image belongs.
To create a class:
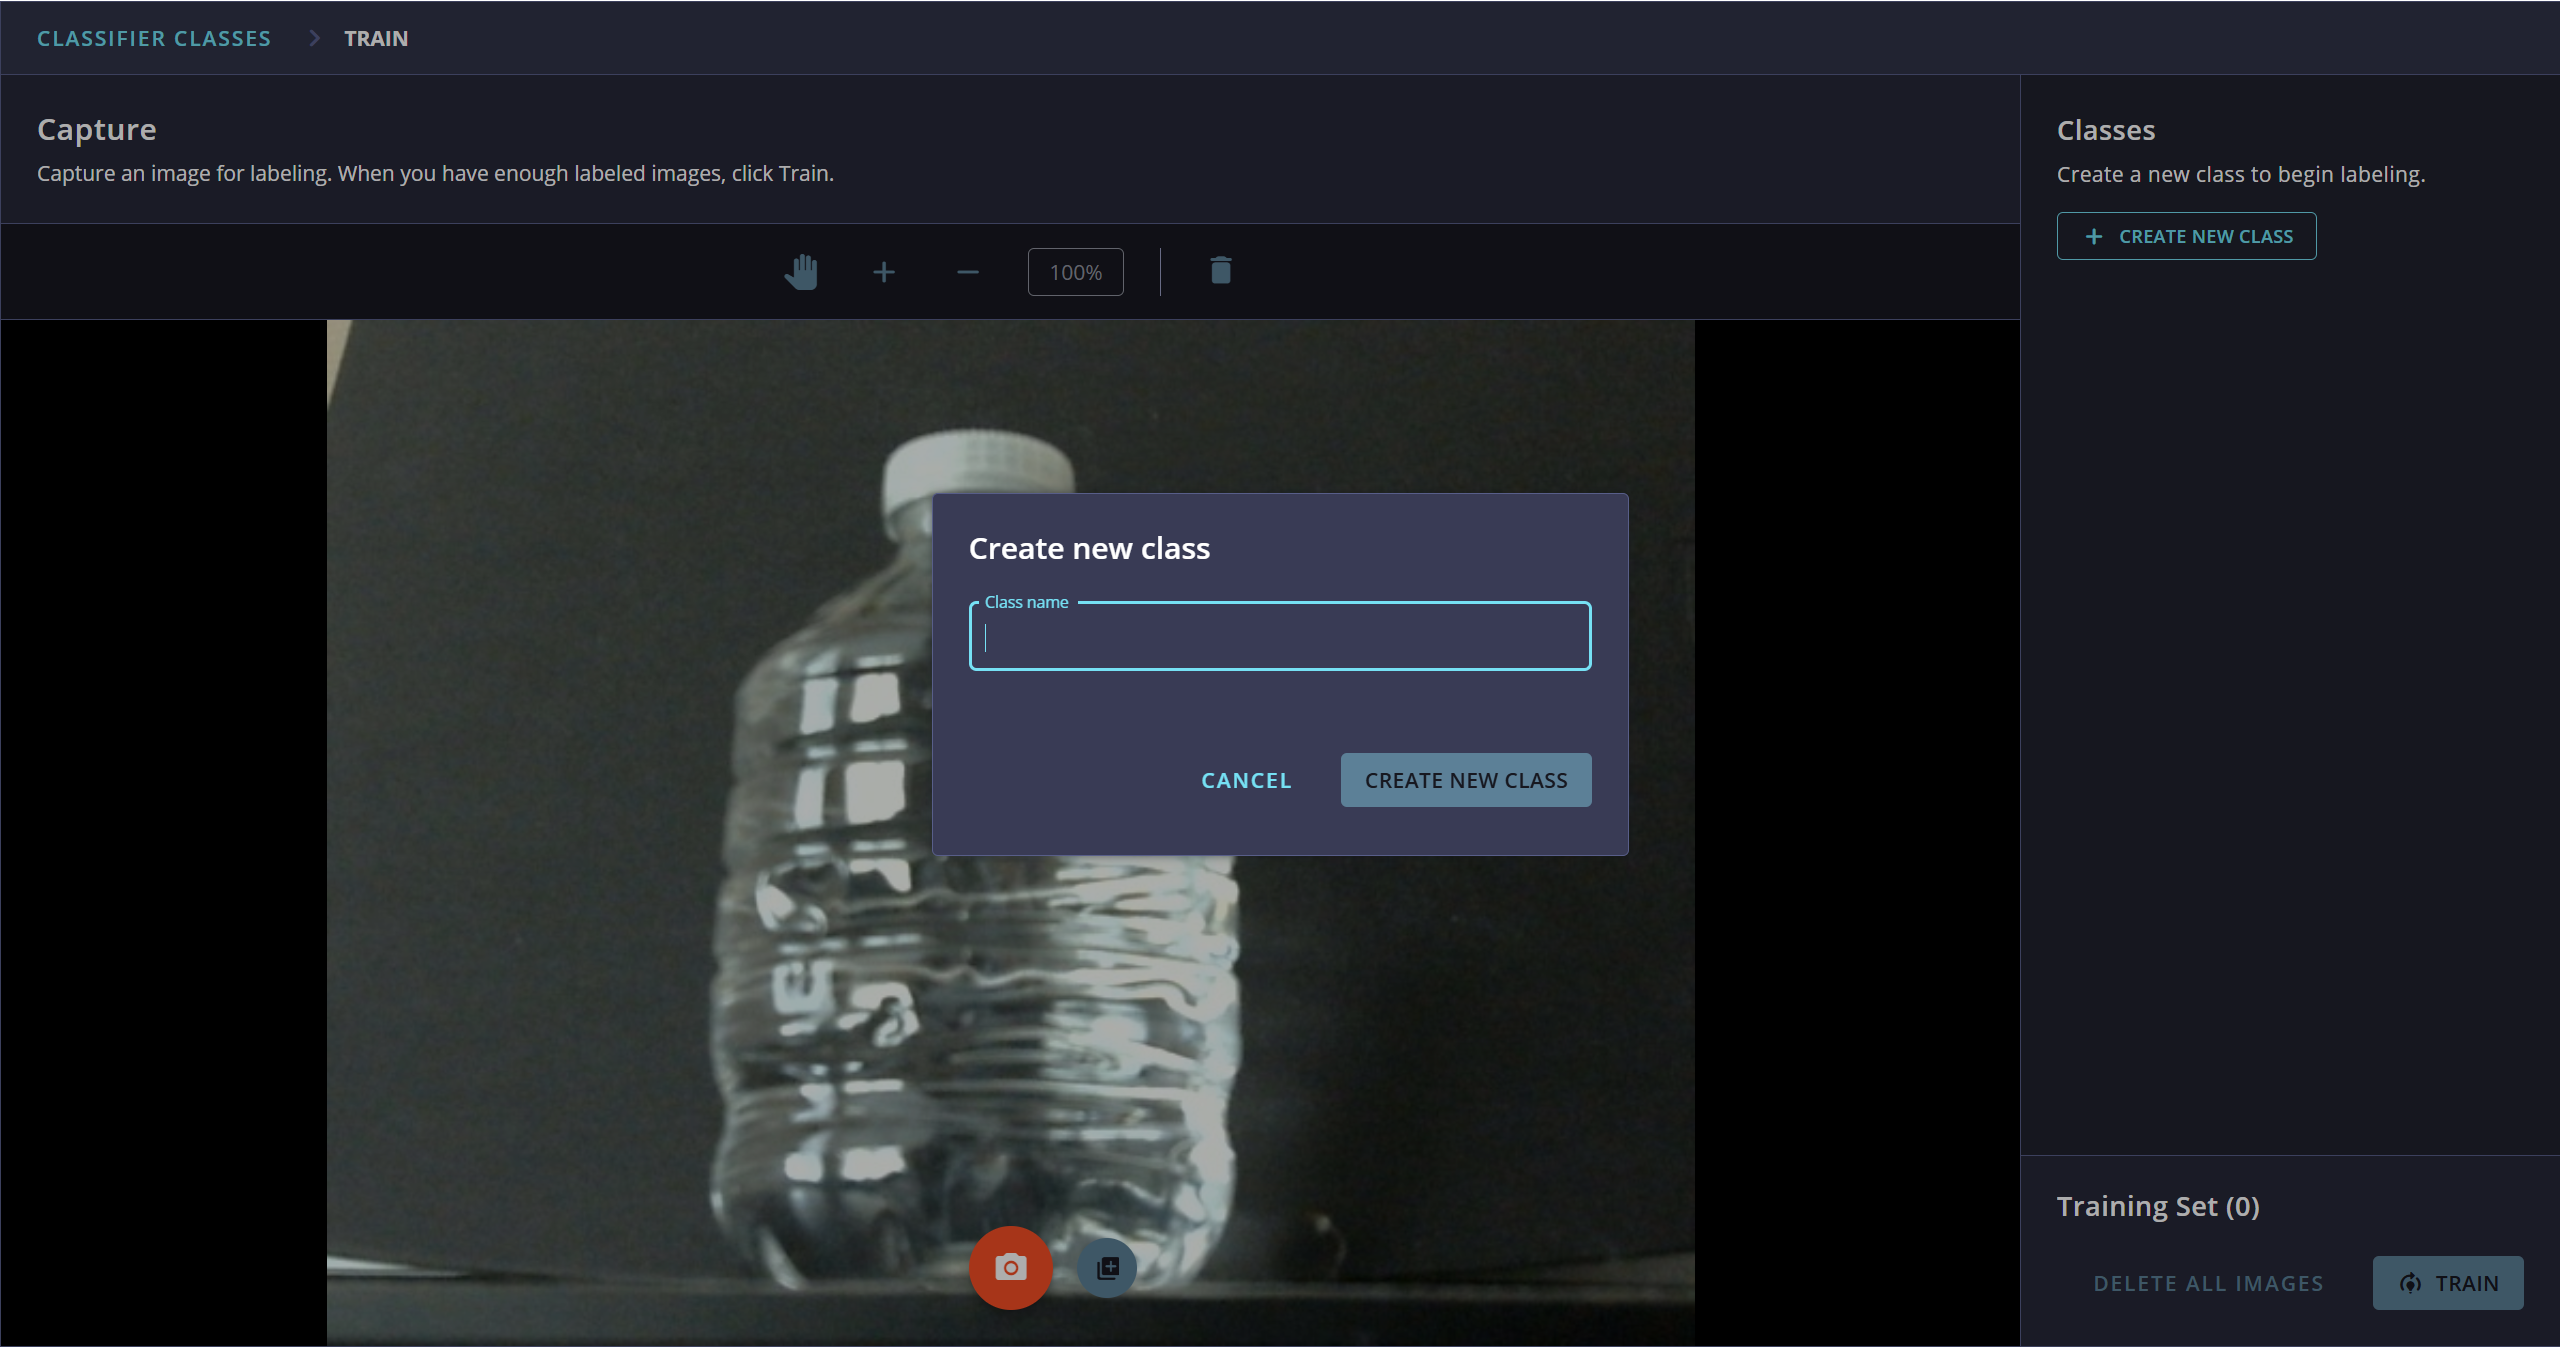
- Click CREATE NEW CLASS in the Classes panel.
- Enter a name for the class.
- Click CREATE NEW CLASS.
- Repeat these steps until you have created all the classes needed for the Brain.
Capturing and Labeling Images
To capture and label an image:
- Position the object you want to capture in front of the camera.
- If necessary, use the image controls to adjust the camera view.
- Click Capture image.
- In the Classes panel, select the class that best represents the captured image.
- Click Add to training set.
- Repeat these steps until you have collected enough images for each class.
After capturing an image, you must assign it to a class and add it to the training set before capturing another image.
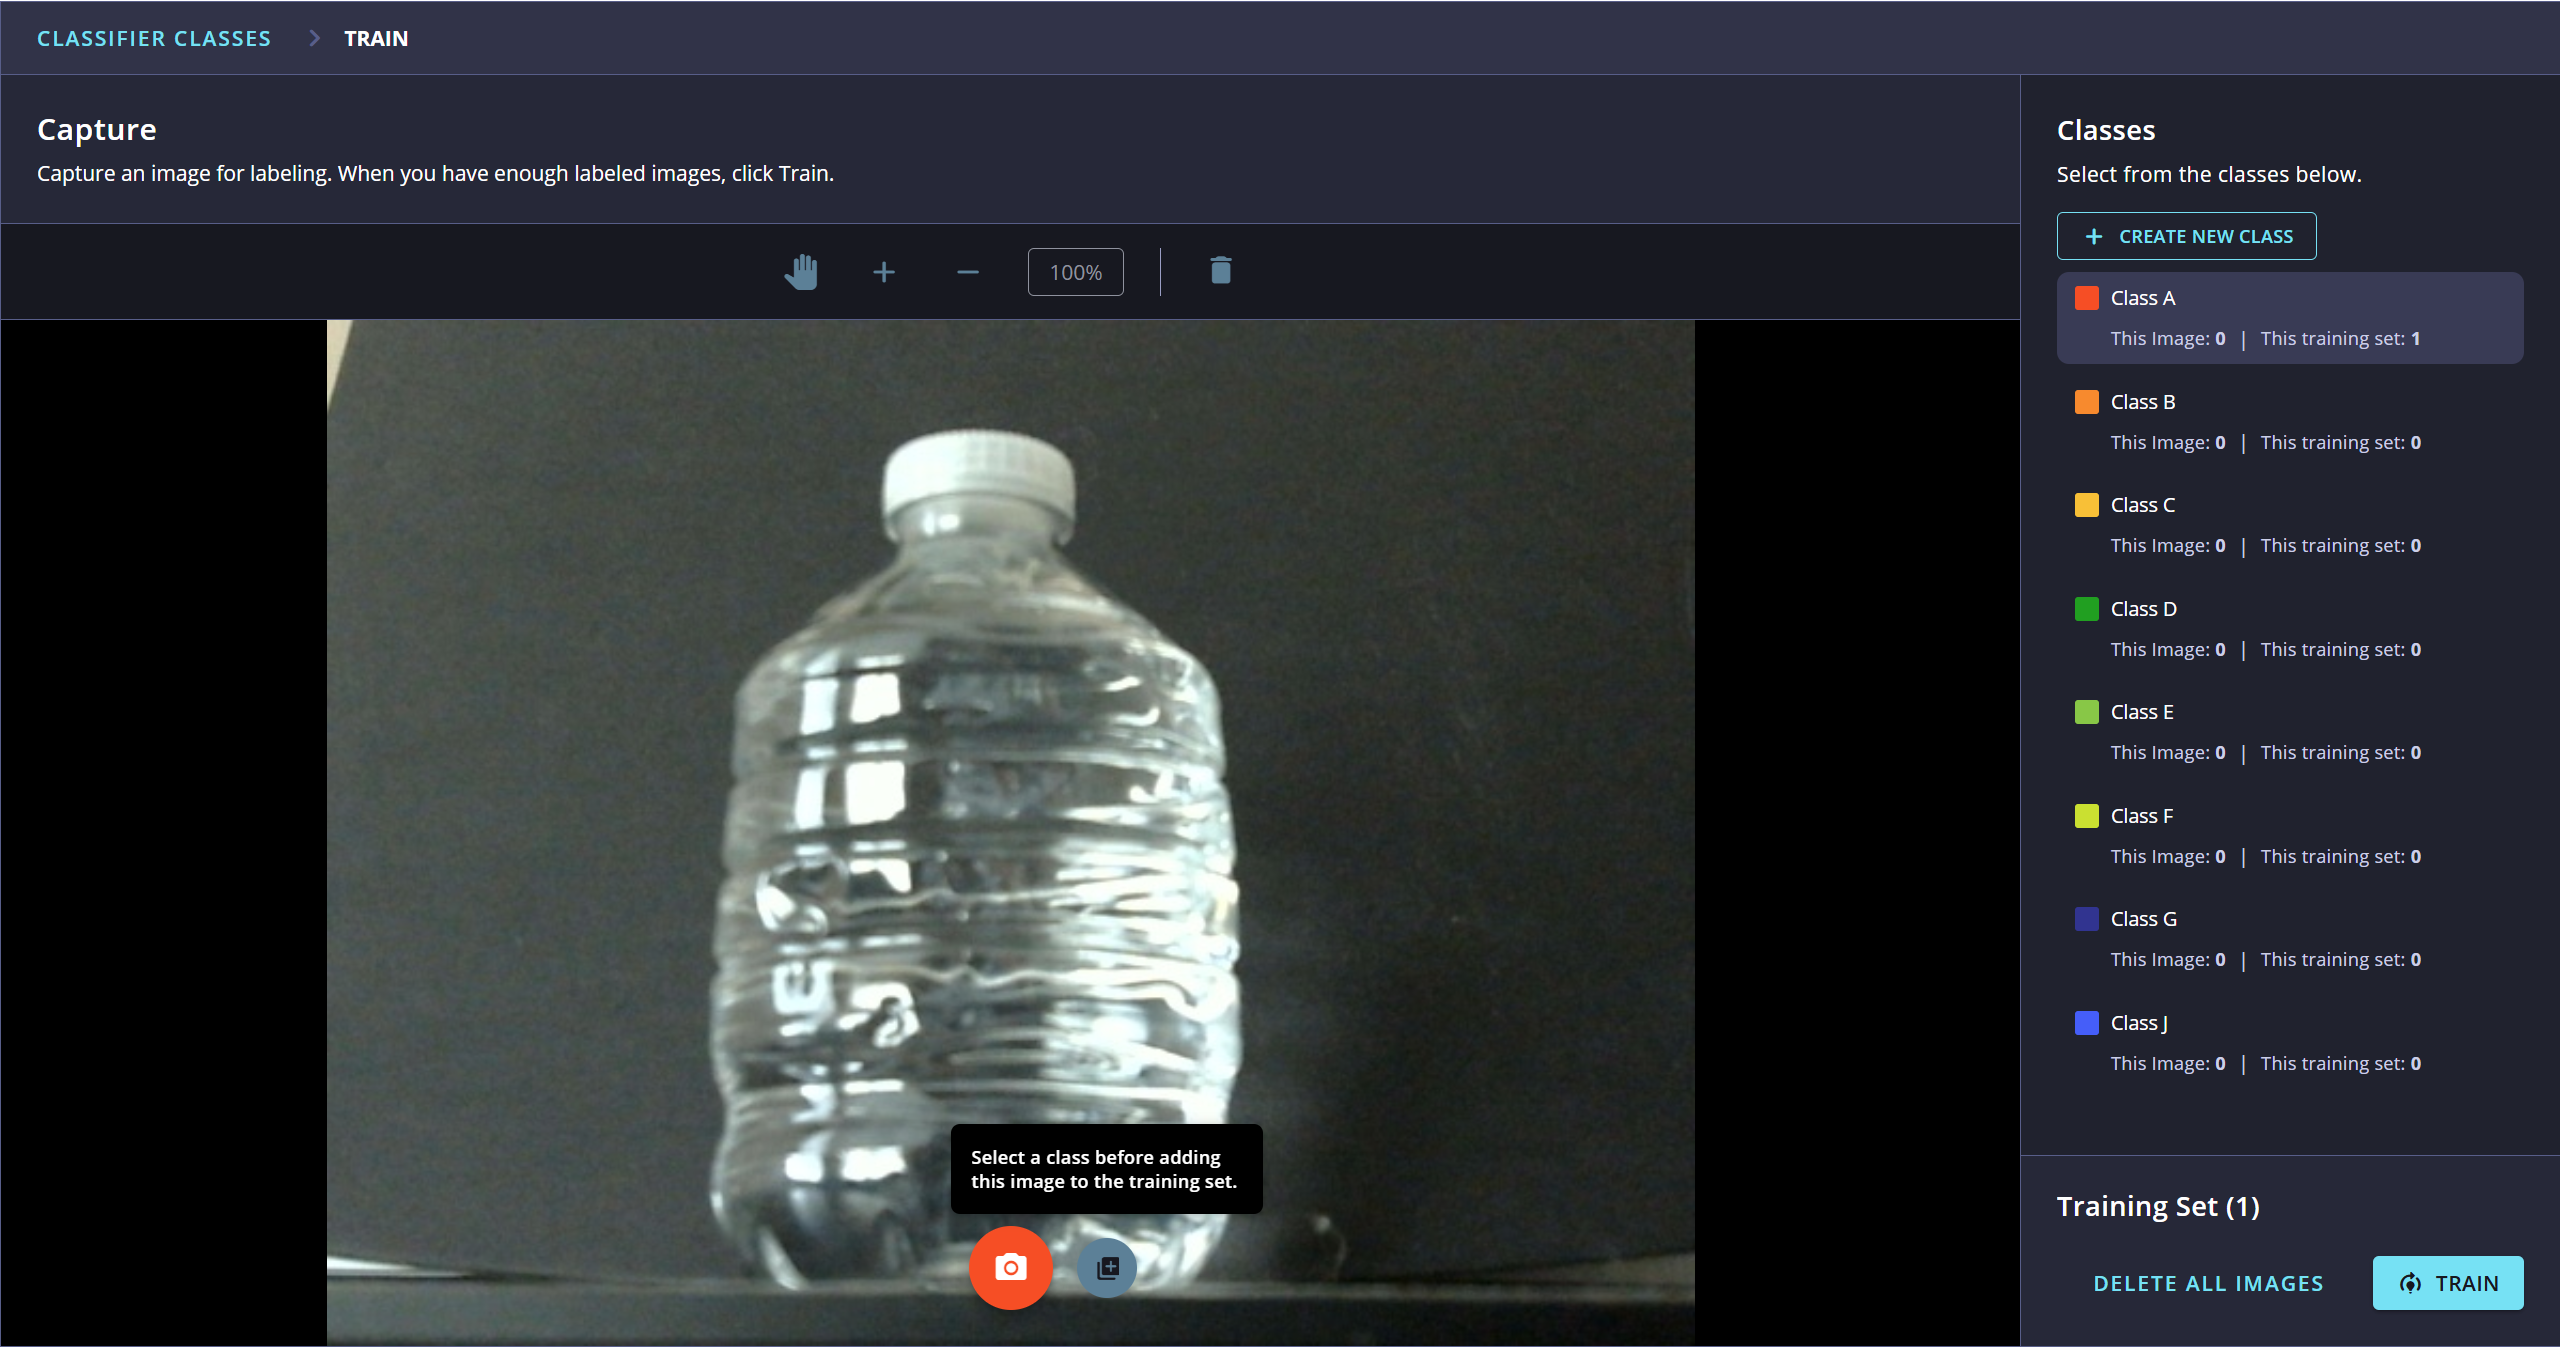
Image Controls
The toolbar above the camera view provides controls for adjusting and managing the displayed image:
- Pan — Moves an enlarged image within the viewing area.
- Zoom In — Enlarges the image.
- Zoom Out — Reduces the image.
- Zoom Percentage — Displays the current zoom level. Select 100% to return to the default view.
- Delete Image — Removes the displayed image.
Image Labels and Class Counts
Each image in a Classification Brain must be assigned to a class before it can be added to the training set.
The Classes panel displays the following counts for each class:
- This Image — Indicates whether the displayed image is assigned to the class.
- This training set — Displays the total number of training images assigned to the class.
The Training Set count displays the total number of images collected across all classes.
Managing the Training Set
To remove all images from the training set, click DELETE ALL IMAGES.
Caution: DELETE ALL IMAGES removes the entire training set. Use this action only when the existing training images are no longer needed.
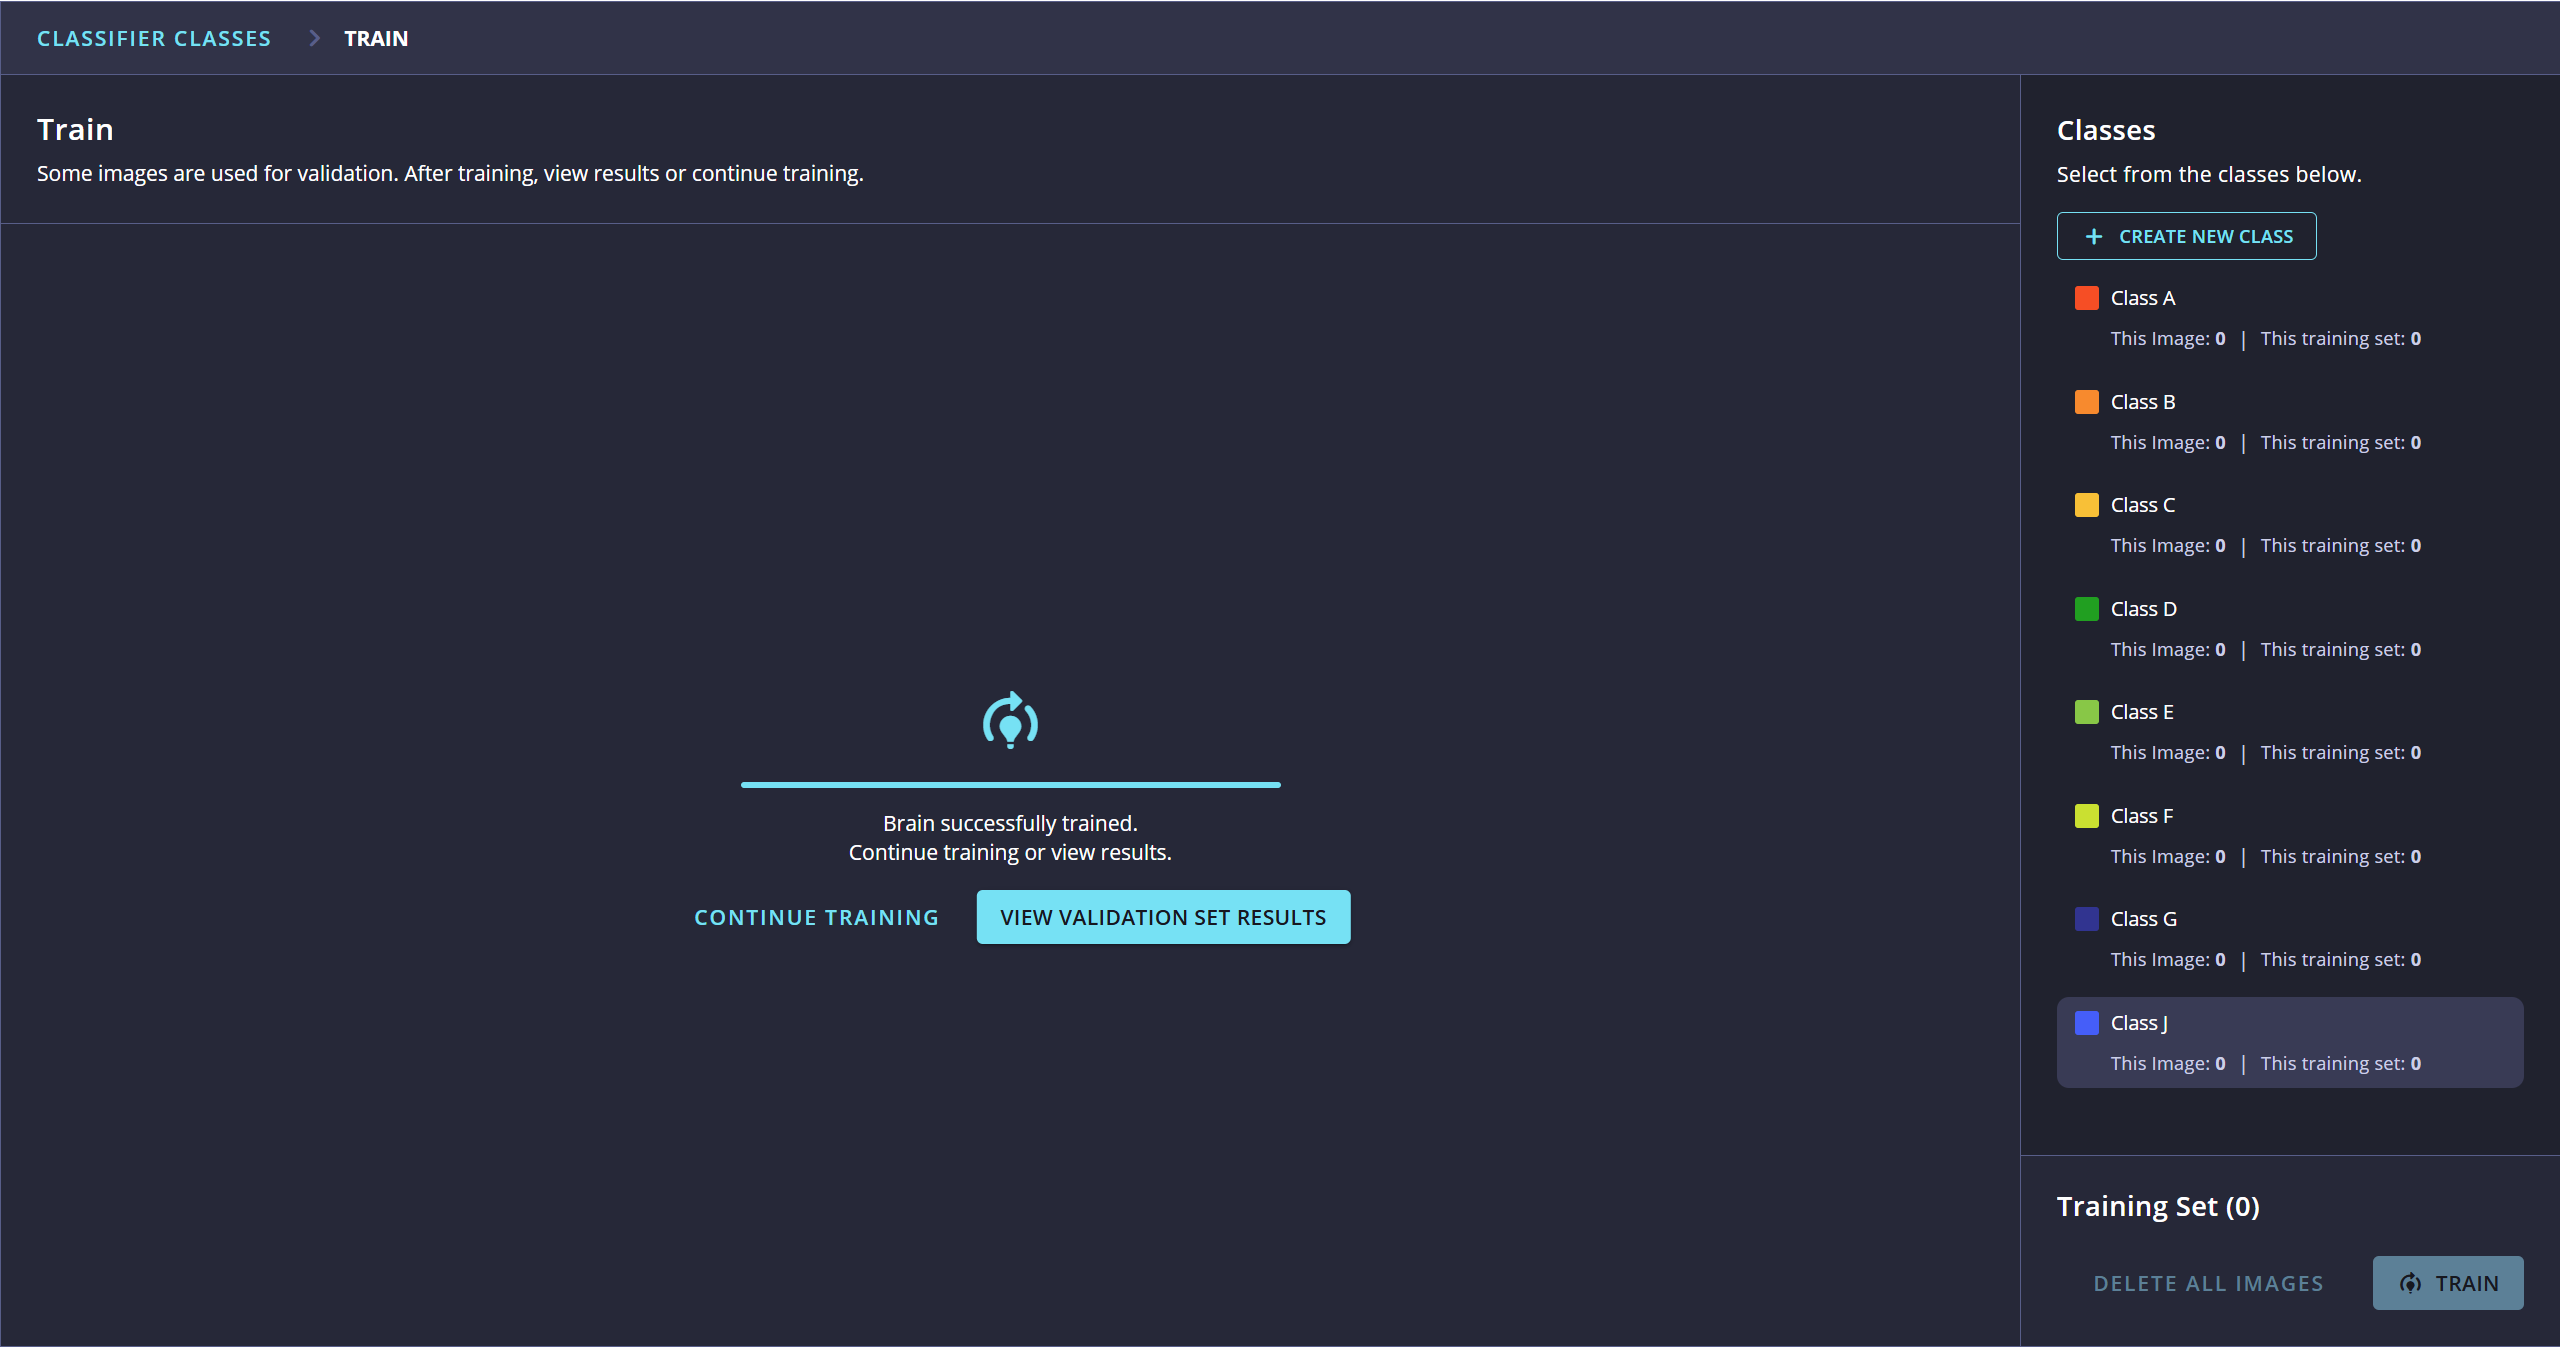
When you have collected and labeled enough images, click TRAIN to begin training the Brain.
Training Brains
After collecting and labeling training images, you can train the Classification Brain.
Before starting training, verify that you have collected enough representative images for each class.
To train the Brain:
- Review the image count displayed for each class.
- Click TRAIN.
- Wait while the Edge Training and Inference Tool trains the Brain.
- When training is complete, confirm that the Brain successfully trained message appears.
After training, select one of the following options:
- Click VIEW VALIDATION SET RESULTS to evaluate the Brain’s performance using the validation set.
- Click CONTINUE TRAINING to return to the Capture page, collect additional images, and train the Brain again.
Validation Images
During training, the Edge Training and Inference Tool reserves a portion of the collected images for validation.
Validation images are not used to train the Brain. Instead, they are used to evaluate how well the Brain performs on images it has not previously seen.
Validation results can help you determine whether the Brain performs sufficiently well or whether you should collect additional images and retrain it.
Evaluating Brain Performance
During training, the Edge Training and Inference Tool evaluates how accurately the Classification Brain classifies images.
A portion of the collected images is reserved as a validation set. These images are not used to train the Brain. After training, the Brain classifies the validation images, and its predictions are compared with the labels assigned during image collection.
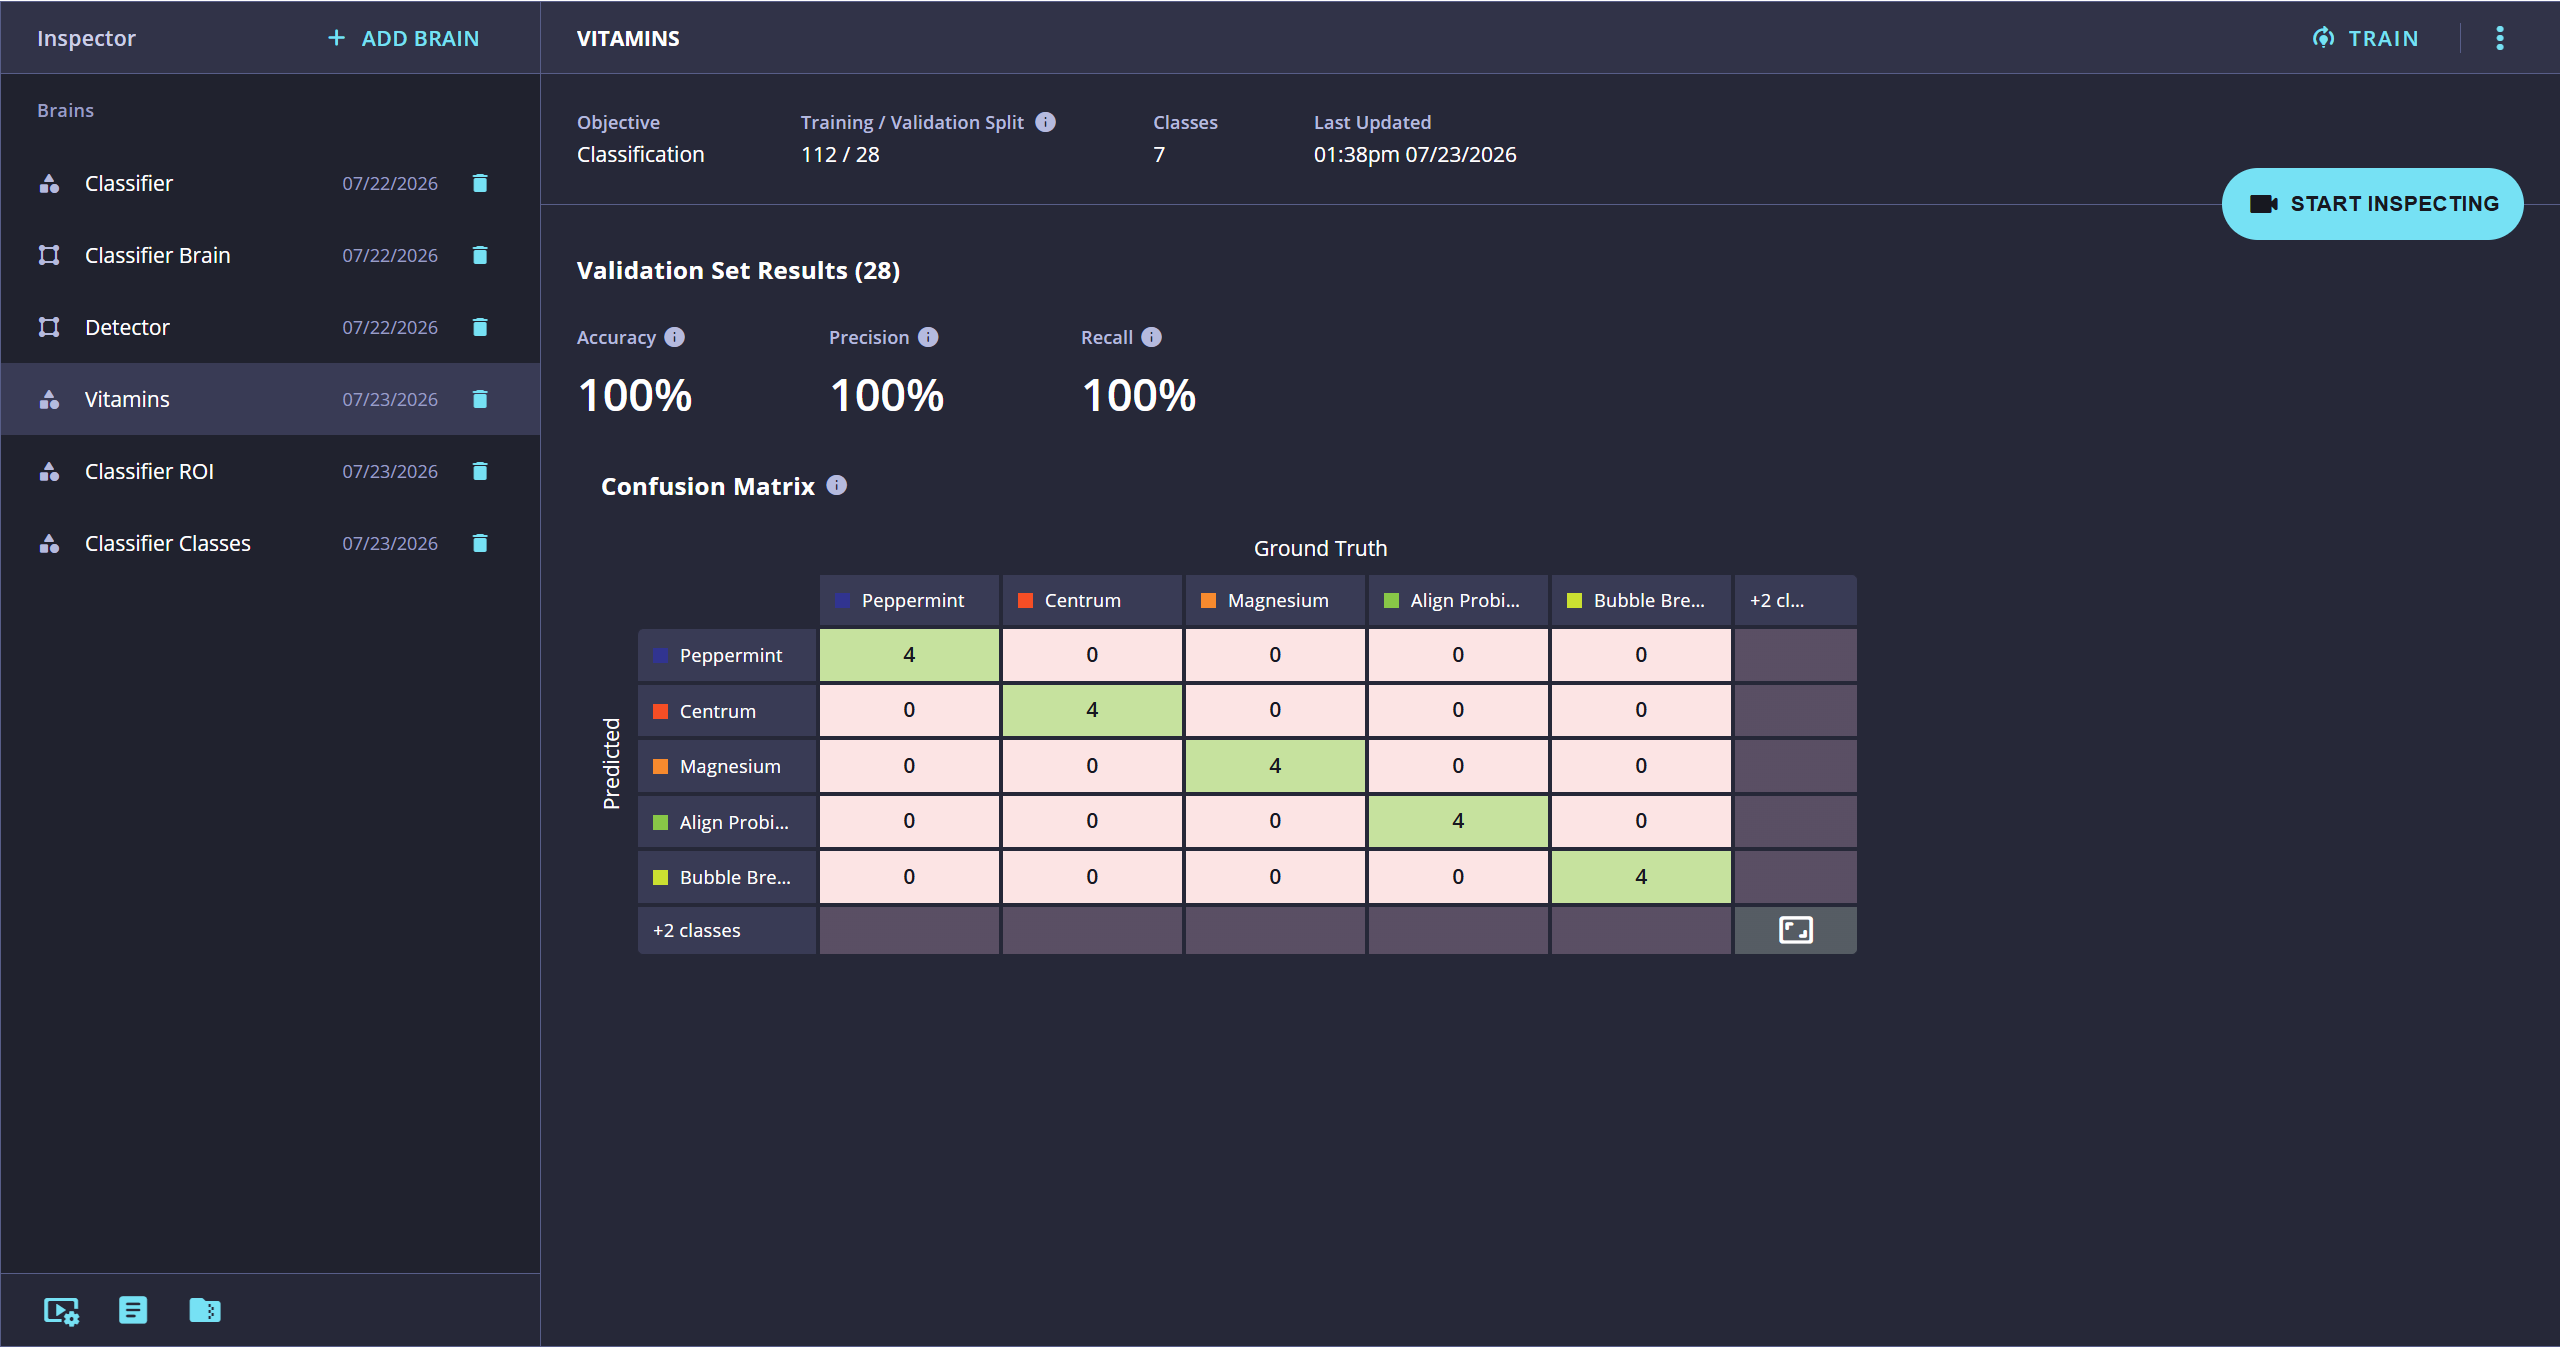
The Validation Set Results page displays performance metrics and a Confusion Matrix that help you understand how the Brain may perform on new images.
Validation Set
The validation set is a subset of the labeled images collected for the Brain.
After training is complete, the Brain attempts to classify each validation image. Its predictions are compared with the image’s assigned class to calculate the Brain’s performance metrics.
Validation results provide an estimate of how well the Brain may perform on similar images that were not used during training.
Brain Summary
The Brain summary displays the following information:
- Objective — The Brain type.
- Training / Validation Split — The number of images used for training and validation.
- Classes — The number of classes defined for the Brain.
- Last Updated — The date and time when the Brain was last updated.
Performance Metrics
The Validation Set Results page provides the following performance metrics.
Accuracy
Accuracy is the percentage of validation images that the Brain classified correctly.
Higher accuracy indicates that the Brain is making correct predictions more consistently.
Precision
Precision measures how often the Brain’s predictions are correct when it predicts a particular class.
Higher precision indicates fewer incorrect predictions for that class.
Recall
Recall measures how often the Brain correctly identifies validation images belonging to a particular class.
Higher recall indicates that fewer valid examples of the class were missed.
Confusion Matrix
The Confusion Matrix provides a detailed view of the Brain’s classification performance.
- Rows represent the classes predicted by the Brain.
- Columns represent the images’ actual classes, identified as Ground Truth.
- Values along the diagonal represent correctly classified images.
- Values outside the diagonal represent misclassified images.
A Confusion Matrix with most values along the diagonal generally indicates better classification performance.
Understanding the Results
The Confusion Matrix can help identify classes that the Brain frequently confuses.
When reviewing the results:
- Larger values along the diagonal indicate correct classifications.
- Values outside the diagonal indicate misclassifications.
- Frequent misclassifications between two classes may indicate that the classes require more distinctive training examples.
- Lower performance for a particular class may indicate that additional images are needed for that class.
If images from one class are frequently predicted as another class, collect additional training images that better represent the differences between those classes.
Improving Brain Performance
For best results, inspection images should be similar to the images used during training. Significant differences in the following conditions may reduce Brain performance:
- Lighting
- Camera position
- Background
- Image quality
- Object position, orientation, or appearance
Collecting a varied set of clear, representative training images can improve overall Brain performance.
Next Steps
After reviewing the validation results:
- Click TRAIN to collect additional images and retrain the Brain.
- Click START INSPECTING to run Live Predictions using the trained Brain.
Running Live Predictions
After training and evaluating a Classification Brain, you can use Live Predictions to classify images from a connected camera in real time.
Starting an Inspection
To begin an inspection:
- Open the Brain’s Validation Set Results page.
- Click START INSPECTING.
- Wait while the Edge Training and Inference Tool loads the trained Brain and begins analyzing the camera feed.
Live Predictions Screen
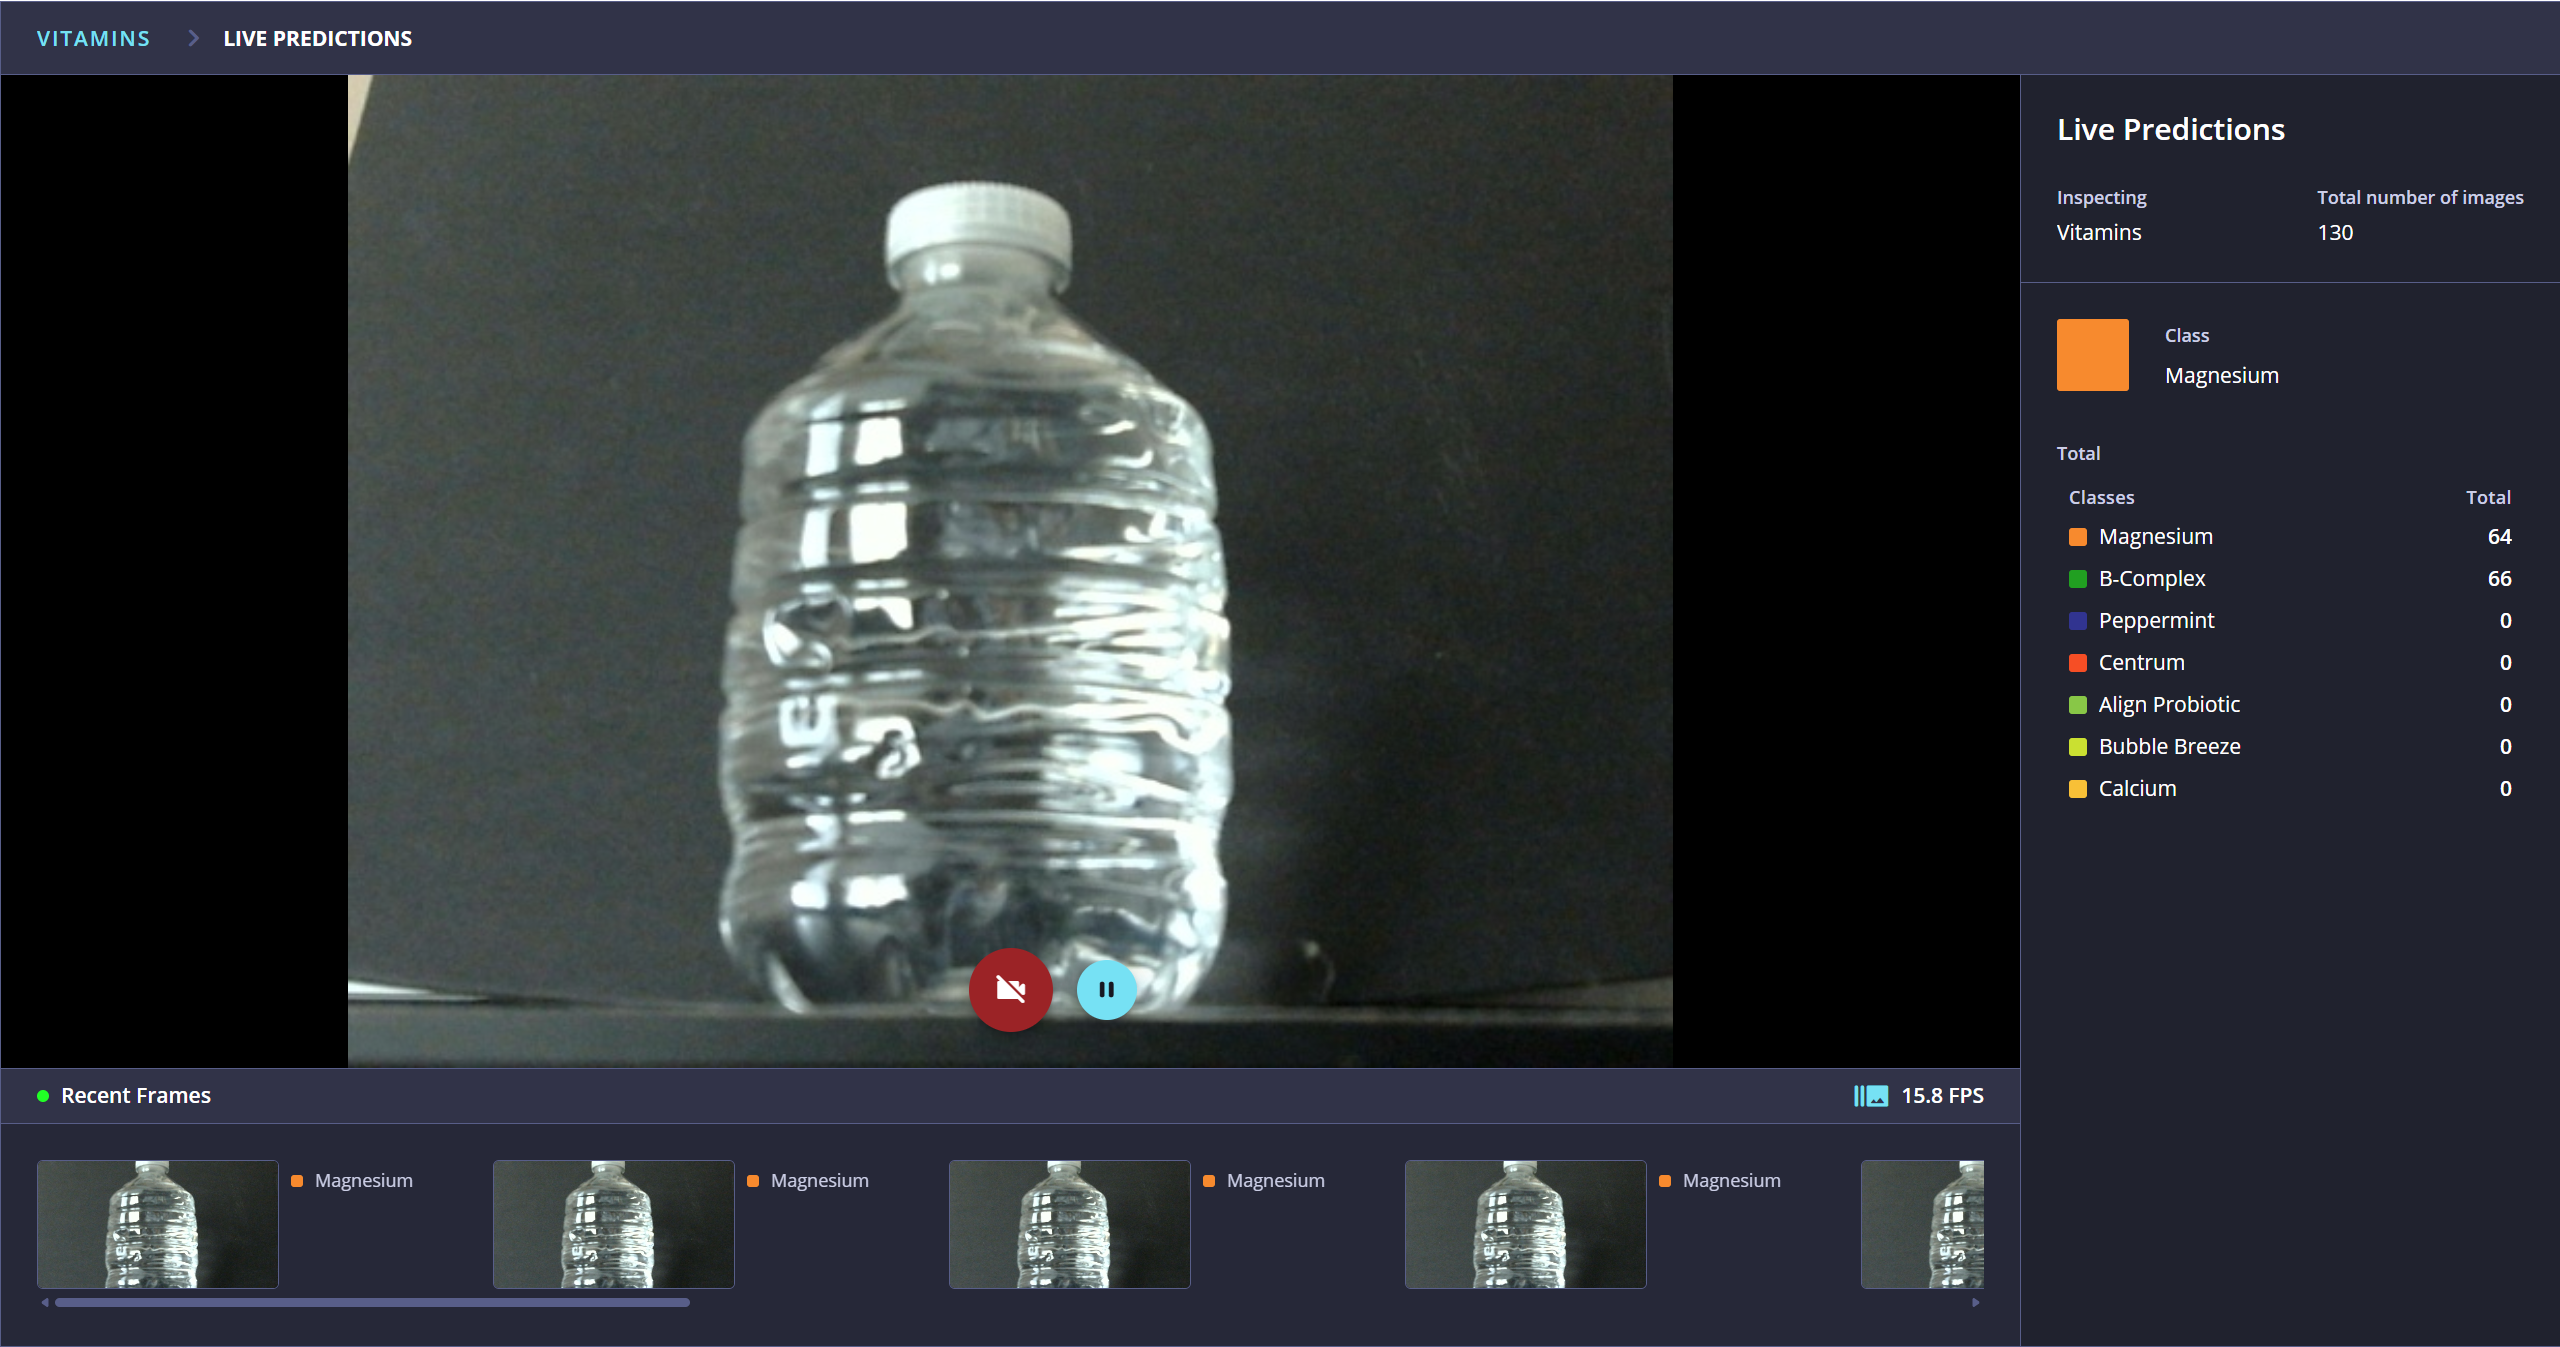
The Live Predictions screen displays the camera feed, the current prediction, prediction totals, recently analyzed frames, and the current processing speed.
Camera Feed
The camera feed displays the live image stream being analyzed by the Brain.
Current Prediction
The Class field displays the class assigned to the most recently analyzed image. The color displayed beside the prediction corresponds to the class color shown in the class list.
Prediction Counts
The Total list displays the number of predictions made for each class during the current inspection session.
Total number of images displays the total number of images analyzed during the session.
The Nothing I know count represents images that the Brain could not confidently assign to one of its trained classes.
Recent Frames
The Recent Frames panel displays recently analyzed images and their predicted classes. Use the horizontal scroll control to review additional frames.
Frame Rate
The Frames Per Second (FPS) indicator displays the current processing speed of the inspection.
Pausing and Resuming an Inspection
Click Pause to temporarily stop processing the camera feed.
Click Resume to continue running Live Predictions.
Stopping an Inspection
Click the red Stop Inspecting control to end the inspection.
The Edge Training and Inference Tool stops processing images and returns to the Brain Results page.
Improving Prediction Results
If the Brain does not consistently predict the correct class, collect additional training images and retrain the Brain.
For best performance:
- Use lighting conditions similar to those used during training.
- Keep the camera position consistent.
- Capture a variety of training images for each class.
- Include examples representing normal variations in object position, orientation, and appearance.
- Include backgrounds and environmental conditions that are likely to occur during inspection.
These practices can improve the Brain’s ability to classify new images accurately.
Updated 3 months ago