Capturing High Quality Images
Overview
The quality of the images used to train the AI model is critical to achieving success with any vision AI system such as Neurala VIA.
The goal of image capture for AI is to maximize the amount of relevant information passed to the machine learning algorithm, and to minimize the noise.
- Relevant information means the visual cues that the AI system uses to determine how to understand and classify the image.
- Noise refers to any information in the image that is irrelevant to the prediction task.
The difference between human vision and AI
The human visual system is good at focusing on subjects that it recognizes. If a person sees a car, they will be able to recognize that it is a car regardless of the variations in its appearance. The car could be a different color or model, seen from a variety of angles or distances, viewed during day or night time, whether it's sunny or raining, and on and on.
AI vision systems use Deep Neural Networks (DNNs) to replicate this human ability, but they are still far from perfect. DNNs use training images to "learn" how to distinguish different types of objects (different classes in a Classifier, or Good/Anomaly in an Anomaly Recognizer) and can apply that knowledge to new images they have never seen before, but only within the space of what they already know.
As an example, a Classifier trained on images of vehicles taken only during sunny days could struggle if presented with images of similar vehicles at night.
The key to optimizing performance of a vision AI system is to:
- Train the AI system on the whole range of variables it will see in productions, and
- Control the environment. Use camera positioning, lighting, lenses, and camera sensors to minimize unnecessary variability during image capture.
Capturing images for best performance
To capture images that will result in the best performance from the AI model, keep the following considerations in mind:
- Maximize the area the product occupies within the image.
- Use lights to reduce image noise that can occur in low-light environments.
- Set the camera shutter speed to eliminate motion blur.
- Ensure the object is in focus.
- Use lights to maintain consistent color and even lighting conditions (for example, avoiding variations due to ambient lighting).
- Set lights to avoid glare, reflections, or overexposure.
- Ensure the object is lit enough to capture all relevant detail for the AI model to make its assessment.
- Use a camera with a global shutter when speed requirements could result in distortion from a rolling shutter.
Setting up for success
This can seem very complicated, and at times it can be. When planning the image capture setup, begin the design with these questions:
- Where can the camera be installed from a practical perspective, and how far is that from the target object?
- How big is the object (or a detail on it) physically?
- How fast will the object be moving on the production line?
- Is the ambient lighting dim or bright, and will it change with the seasons or time of day?
If you know the answers to these questions, you can eliminate most of the guesswork.
Making the object big enough
There are three main ways to set up image capture so the object is large and prominent in the image.
- Position the camera close to the object.
- Choose a lens with a longer focal length, so that the object takes up more of the image area, even if it’s further away.
- Use the ROI (region-of-interest) feature in Brain Builder or the camera to crop out parts of the image outside the object of interest.
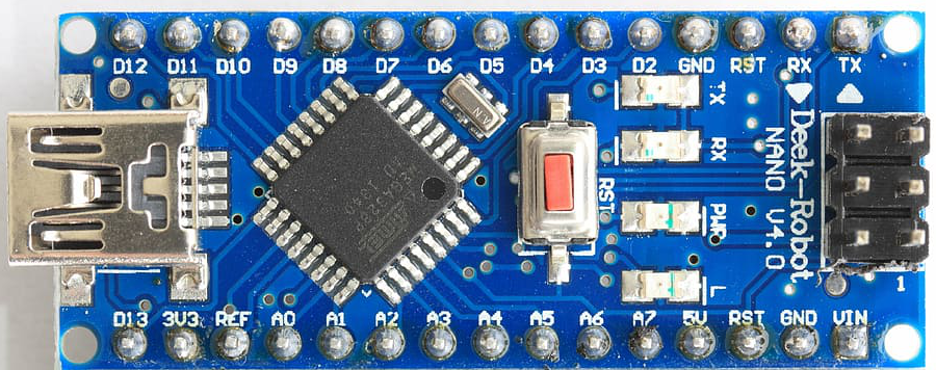
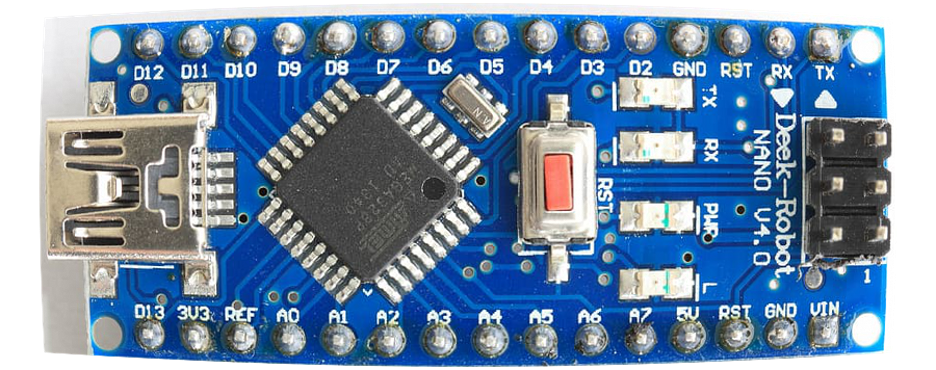
When using the ROINote that the ROI area should meet or exceed the recommendations for the minimum pixel size for the AI system (e.g. 256 x 256). If the cropped image needs to be digitally up-scaled to be fed into the neural net, it can introduce artifacts that could degrade performance. If you plan to use a small ROI as a percentage of the image area, you need a sharp lens and a high-resolution sensor to make this work.

Example: jagged edges from up-scaling up a crop; also artifacts from too high compression ratio
Making the object bright enough
As a rule, the more light the better. To keep reflections from the object to the camera lens to a minimum, it’s better to have more light sources around the object than one single bright light. There are many tutorials on-line about product photography, and similar theory applies here.
Modern LED lights do not emit a lot of heat, are power efficient, and don’t need a lot of space. Sufficient lighting near the object can eliminate the variability caused by ambient lighting conditions. The better the subject is lit, the easier it is to get the camera settings right.
If additional lights can't be used, camera and lens settings can help get a good quality image:
- If the object is stationary, or not moving fast, increasing the shutter speed will increase the amount of light captured by the camera.
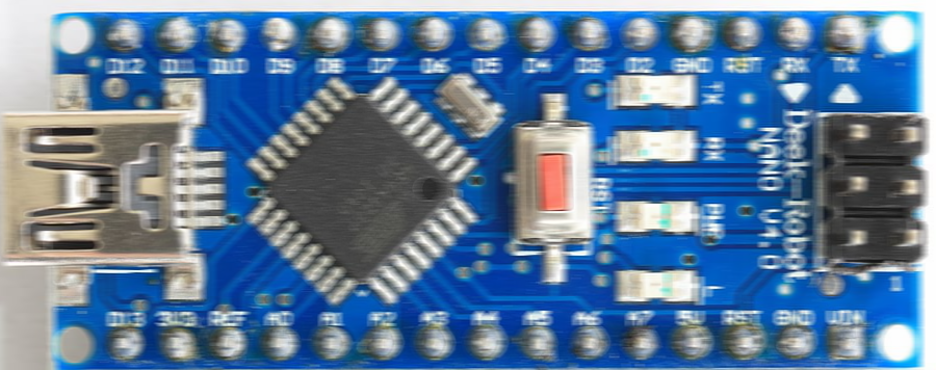
- Increasing the lens aperture (or f-stop) can also increase the amount of light taken in, but be careful. A large aperture means short depth-of-field, which can result in parts of the object falling out-of-focus.

Example: large aperture makes depth-of-field (distance from lens, which is in focus) very short.
- The camera brightness - or ISO value - can also be increased. Higher ISO values can add noise to the image, which will severely degrade AI performance.
To test the amount of noise in images, take 2 images in quick succession. Then use a tool such as ImageMagick to compare those images pixel-by-pixel. A high level of pixel variation indicates a large amount of image noise. If this is the case, then changes should be made to reduce noise before training the AI model.

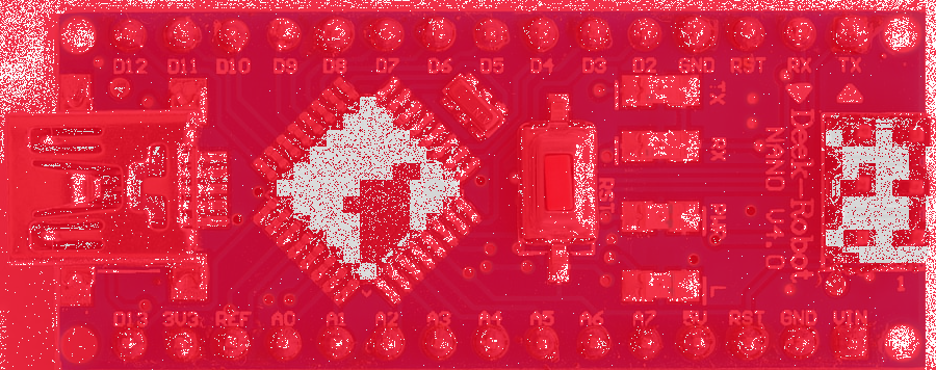
Example: from the top: original image, slightly noisy image, difference between the two images (red pixel indicates different value)
Capturing enough detail
Assuming the object is large enough within the image, it is still important to make sure the image features that determine its classification are sufficiently pronounced. As a rule of thumb, if a crucial detail is not visible with the naked eye, the AI algorithm will probably not see it either.
What can cause the image to lack detail?
-
If the shutter speed is too slow for the speed of the object, this will create motion blur. There are many free on-line motion blur calculators, which will provide the maximum shutter speed to avoid motion blur with a given lens, object distance, and object velocity.
-
A camera with a rolling shutter can cause shapes to appear deformed.
-
The object will have blurred details if the lens isn’t focused properly. Focusing will be less sensitive with smaller aperture values.

-
The sensor resolution or the lens sharpness is insufficient to capture the crucial details.
-
The lens distorts the object. Extremely wide angle or fish-eye lenses can be problematic for AI, as they cause the object to change in shape depending on where in the image area the object is located.
-
The image has too much noise.
-
The image has been saved into too small a file size, causing compression artifacts.
Putting it all together
The old computing idiom of “garbage in, garbage out” definitely applies to vision AI. Taking the time to set up the imaging station so that it produces consistent high-quality images will solve 95% of the problems that can arise in training and deploying AI inspection software. If the imaging station produces inconsistent images with compromised quality, making AI work will be an uphill battle.
While there are many factors that can impact image quality, the most important considerations are:
- Make sure there is plenty of light.
- Capture the object prominently in the image.
- Ensure the object details are clearly visible and sharp.
Spending the time to get these parameters right will save a lot of time and effort later on.
Updated about 1 year ago