Creating Datasets and Uploading Images
Datasets in Brain Builder are collections of images that are used to train Brains. There are three types of Brains that can be trained in Brain Builder:
| Model Type | Details |
|---|---|
| Classifier | Classification models (or "Classifiers") analyze the full image (or a region of the image) and classify the image into one of many "classes" on which they have been trained. These types of models can be used to sort products that are mixed together on a conveyor belt. Integrate vision AI with an automation system to customize product handling based on type. Classifier model types include Learning Classifier and Static Classifier. |
| Anomaly Recognizer | Like Classifiers, Anomaly Recognition models (or "Anomaly Recognizers") analyze the full image or a specific region. They are trained on what normal product images should look like. The models can then recognize when there is an anomaly or defect in the product and alert the operator. Anomaly model types include Anomaly Recognizer and Anomaly Hi-Fi. |
| Detector | Detection models (or "Detectors") can locate one or more instances of defined objects within an image. These models use bounding boxes to show where trained object classes are located and can find multiple instances of an item in a single image. |
Before you begin...
The accuracy of an AI model is directly related to the quality of the data on which it is trained. Before capturing and uploading images, please review Neurala's best practice guidance to ensure that your data is as effective as possible.
Image quantity
Brain Builder can be trained using less data than most traditional vision AI systems. Neurala recommends starting to train your Brain using 50 images per class. For Anomaly Recognition, that would be 50 images of normal product. For Learning Classification, that means 50 images for each object class you are training the Brain to classify.
Some use cases may require more images, but starting with 50 per class will give you a sense of whether that is enough or if more are necessary.
Supported file types
Images captured and stored by Inspector may be loaded into Brain Builder as they are. If images are captured through other means, they must be one of the following common image file formats:
- JPG/JPEG
- PNG
Please note that BMP and GIF images are not supported. Neurala recommends using images that have been captured directly from the camera using Inspector.
📸Creating datasets
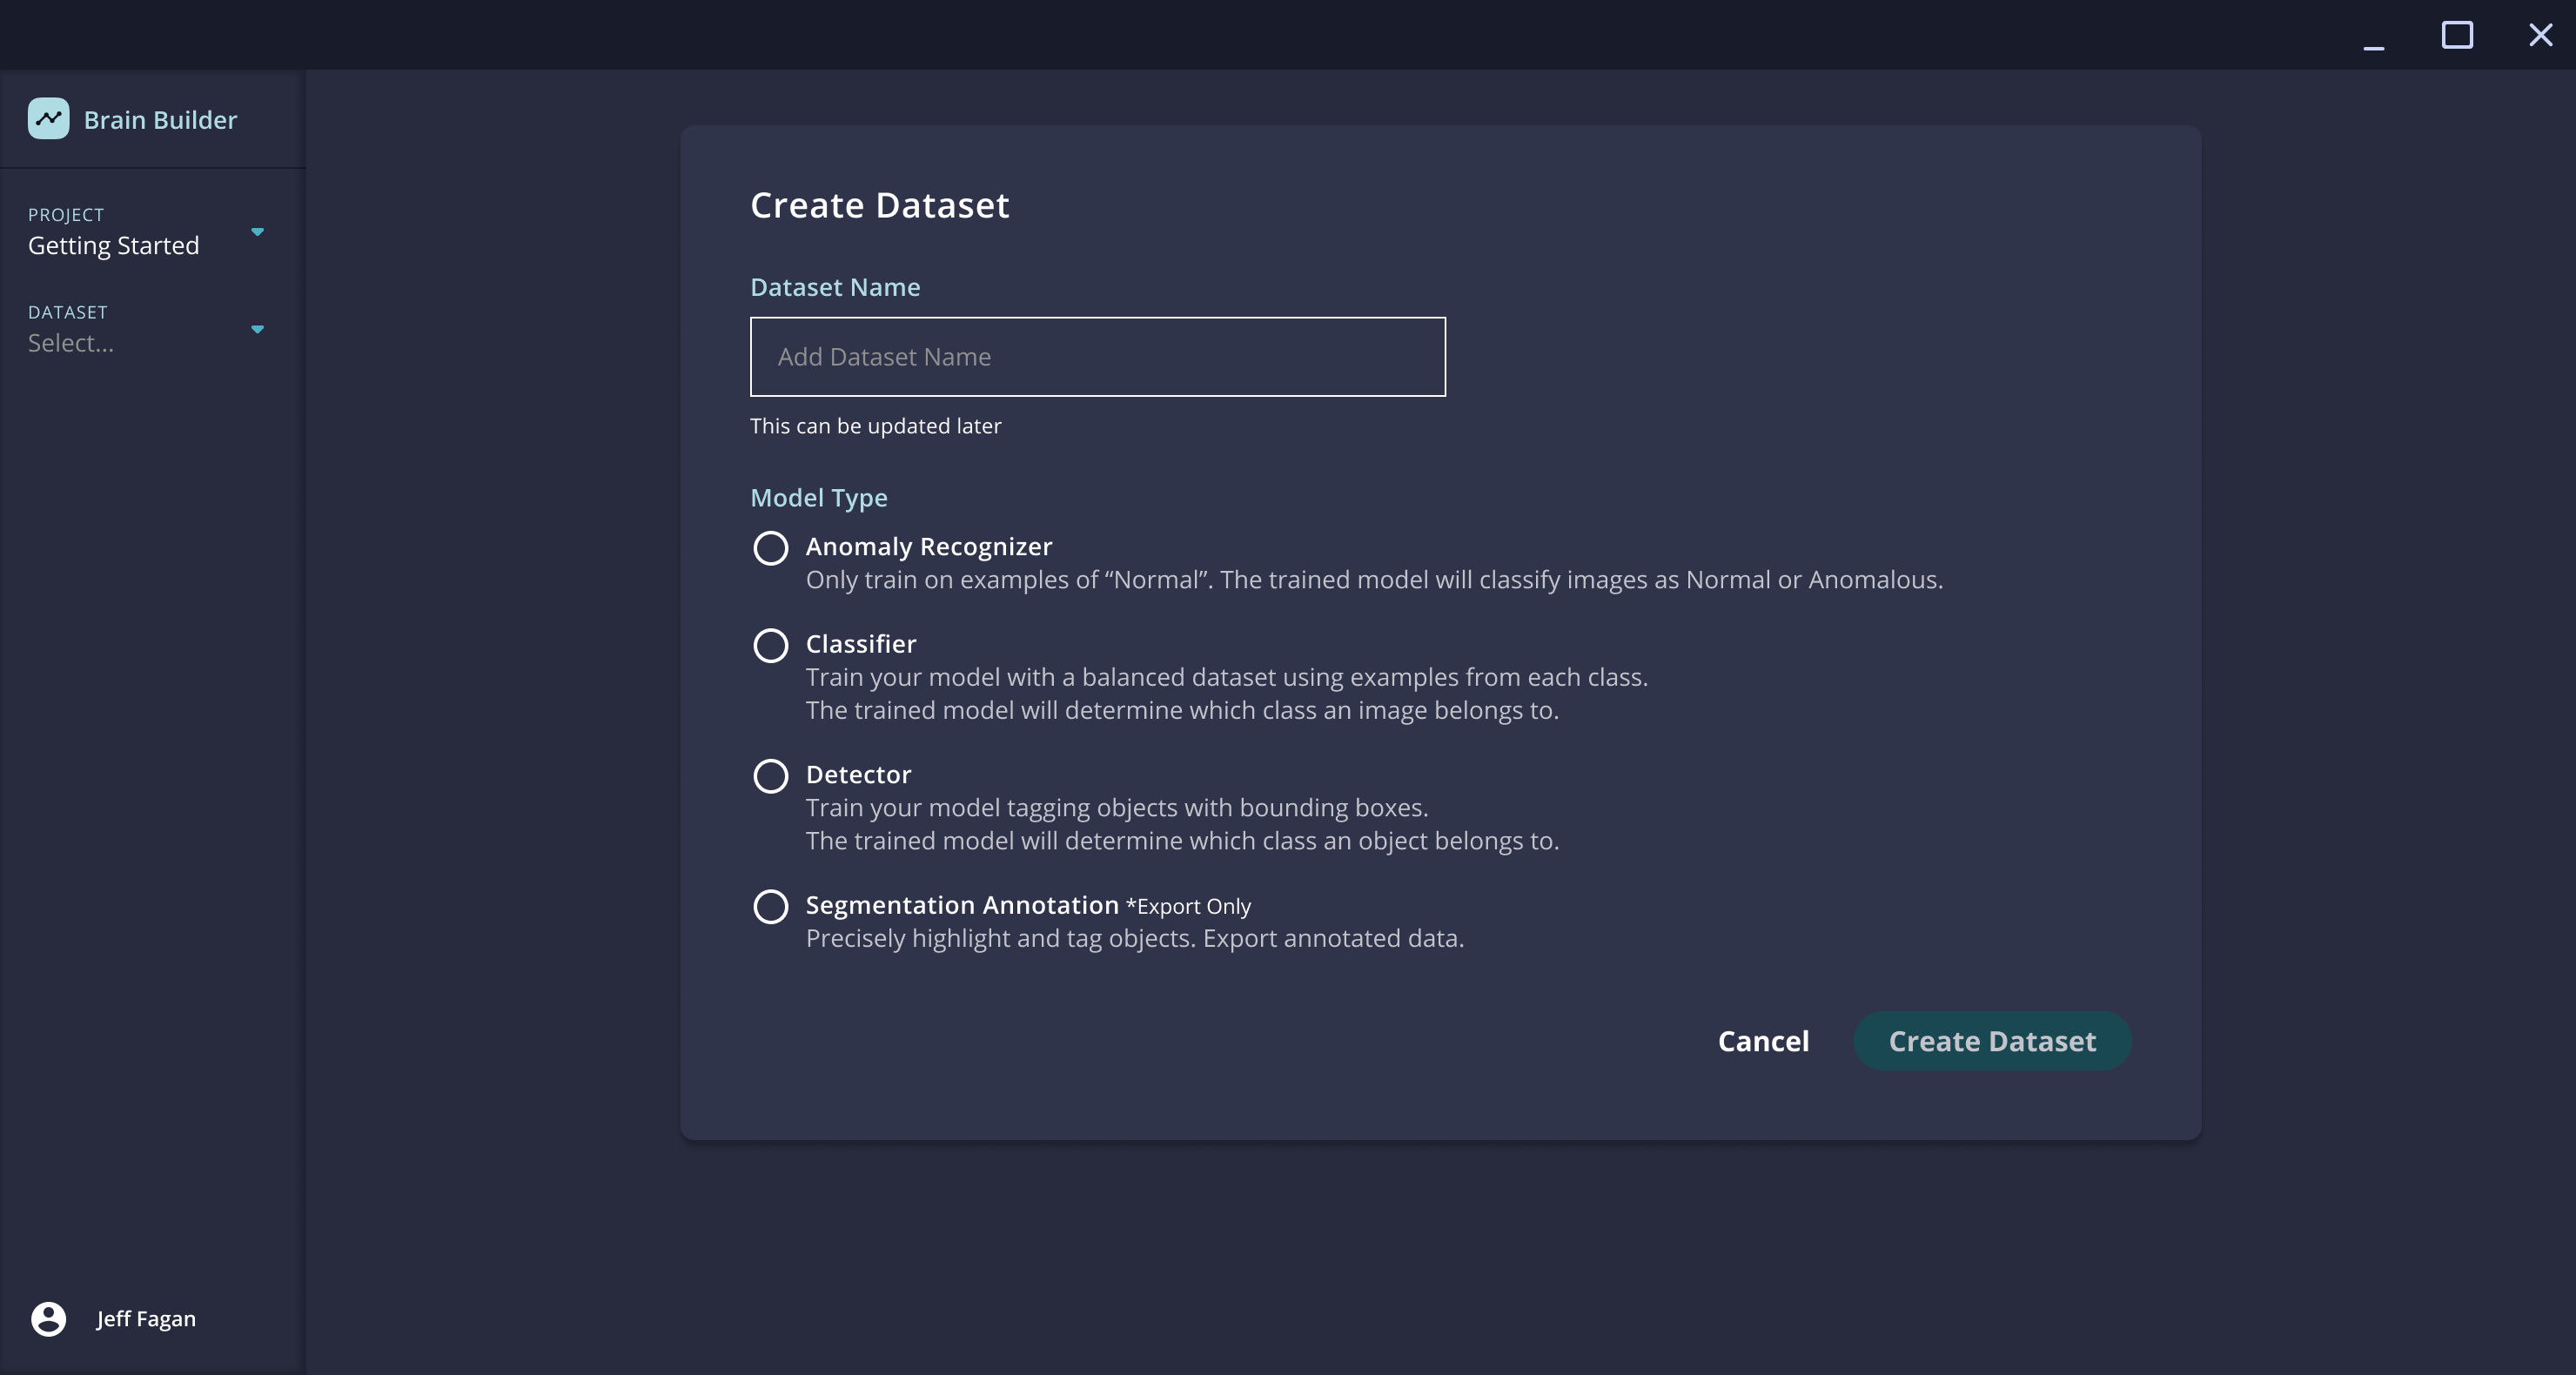
- To create a Dataset, open a Project and click the + Create Dataset button. You'll then be prompted to select which type of Dataset you wish to create. Choose the type of Dataset you want to create and give it a name.
- When creating an Anomaly Recognizer or Classifier dataset, Brain Builder gives additional options:
- For an Anomaly Recognizer, choose whether the dataset will include the ability to build an Anomaly Hi-Fi brain.
- For a Classifier, choose whether the dataset will include the ability to build a Static Classifier.
Both of these options can be changed after the dataset has been created.
Segmentation datasets
Cloud Brain Builder has is the option to create a Segmentation Annotation dataset. This is a dataset type that is used solely to create segmentation labels on images. This dataset type is not available in locally-installed Brain Builder.
⤴️ Uploading data - Classifiers and Anomaly Recognizers
To train the Brain, you will need to upload images. The upload process is the same for both locally-installed and cloud Brain Builder, but the time to load and process images may vary based on the specifications of the local computer and/or the speed of the internet connection.
Uploading images into Brain Builder on a local PC does not send any data into the cloud. Upload simply refers to loading the images into Brain Builder to be labeled and used to train the Brain.
Images can be uploaded either with or without class labels or annotations. For Anomaly Recognizers and Learning Classifiers, training begins during the upload process if labels are included. If images are uploaded without labels, then the labels will have to be applied at a later step. (See Training Classifiers and Anomaly Recognizers.
It is generally more efficient to label images during the upload process.
To start uploading data, navigate to the Dataset page and click the Upload button.
Dataset Split
Brain Builder will offer a choice to determine how the dataset will be divided into Training and Validation sets.

- Dynamic training and validation sets - Brain Builder will automatically split the data into training and validation sets during the upload process.
- Static training and validation sets - use this setting if the data has already been divided and Brain Builder should use the existing split.
The dataset split selection cannot be changed after the dataset has been created.
Uploading static training and validation sets
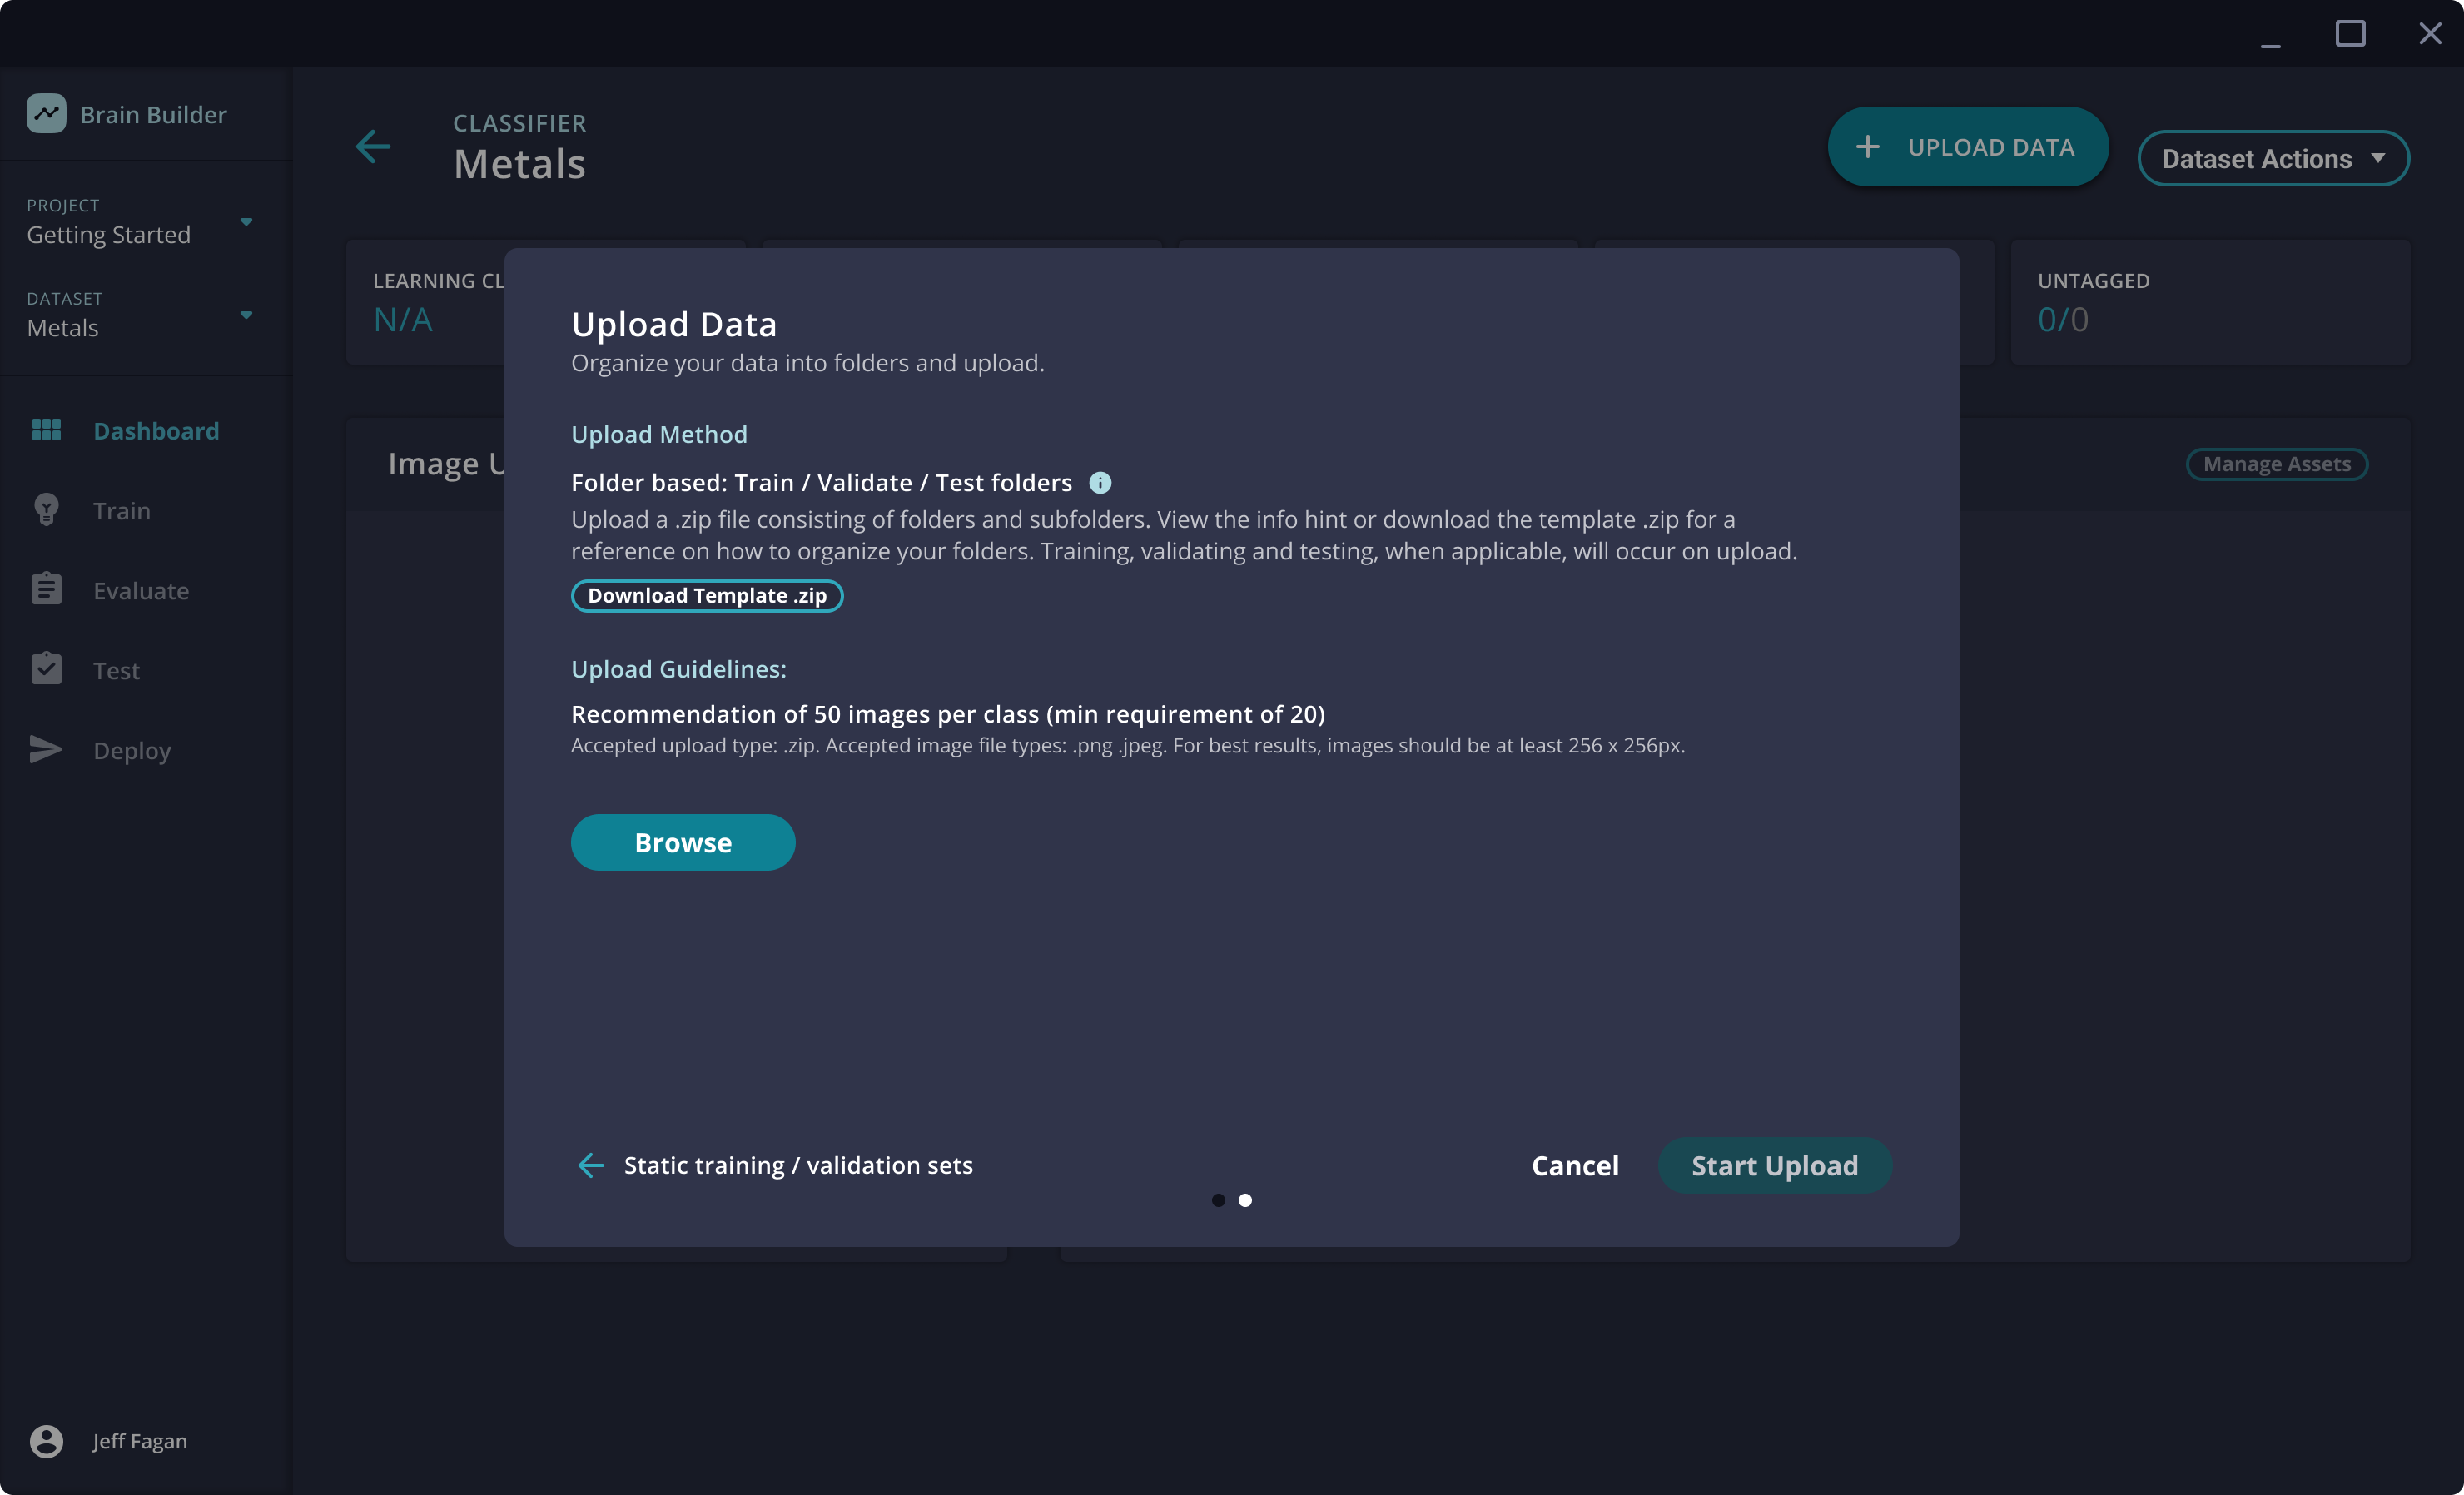
Images that are already divided into static training and validation sets must be uploaded as a zip file that contains folders organized as follows:
- Train
  - Class A
  - Class B
  - Class C
- Validation
  - Class A
  - Class B
  - Class C
- Test
  - Image 1
  - Image 2
  - Image 3
Uploading dynamic training and validation sets
Images uploaded using the dynamic split option can be uploaded a few different ways depending on if and how labels are being applied during the upload process.
Image labels
When training a Classifier or Anomaly Recognizer, a label is applied to each image.
- In a Classifier, the label is one of the classes on which the Brain is being trained.
- For Anomaly Recognizers, the label is either Normal or Anomaly, depending on whether there are any defects in the image.
Labels can be applied during the upload process or in the Brain Builder user interface after uploading. The process to add labels after uploading is detailed here: Training Classifiers and Anomaly Recognizers.
There are two ways to apply labels during the upload process:
- File based upload
- Folder based upload
File based upload
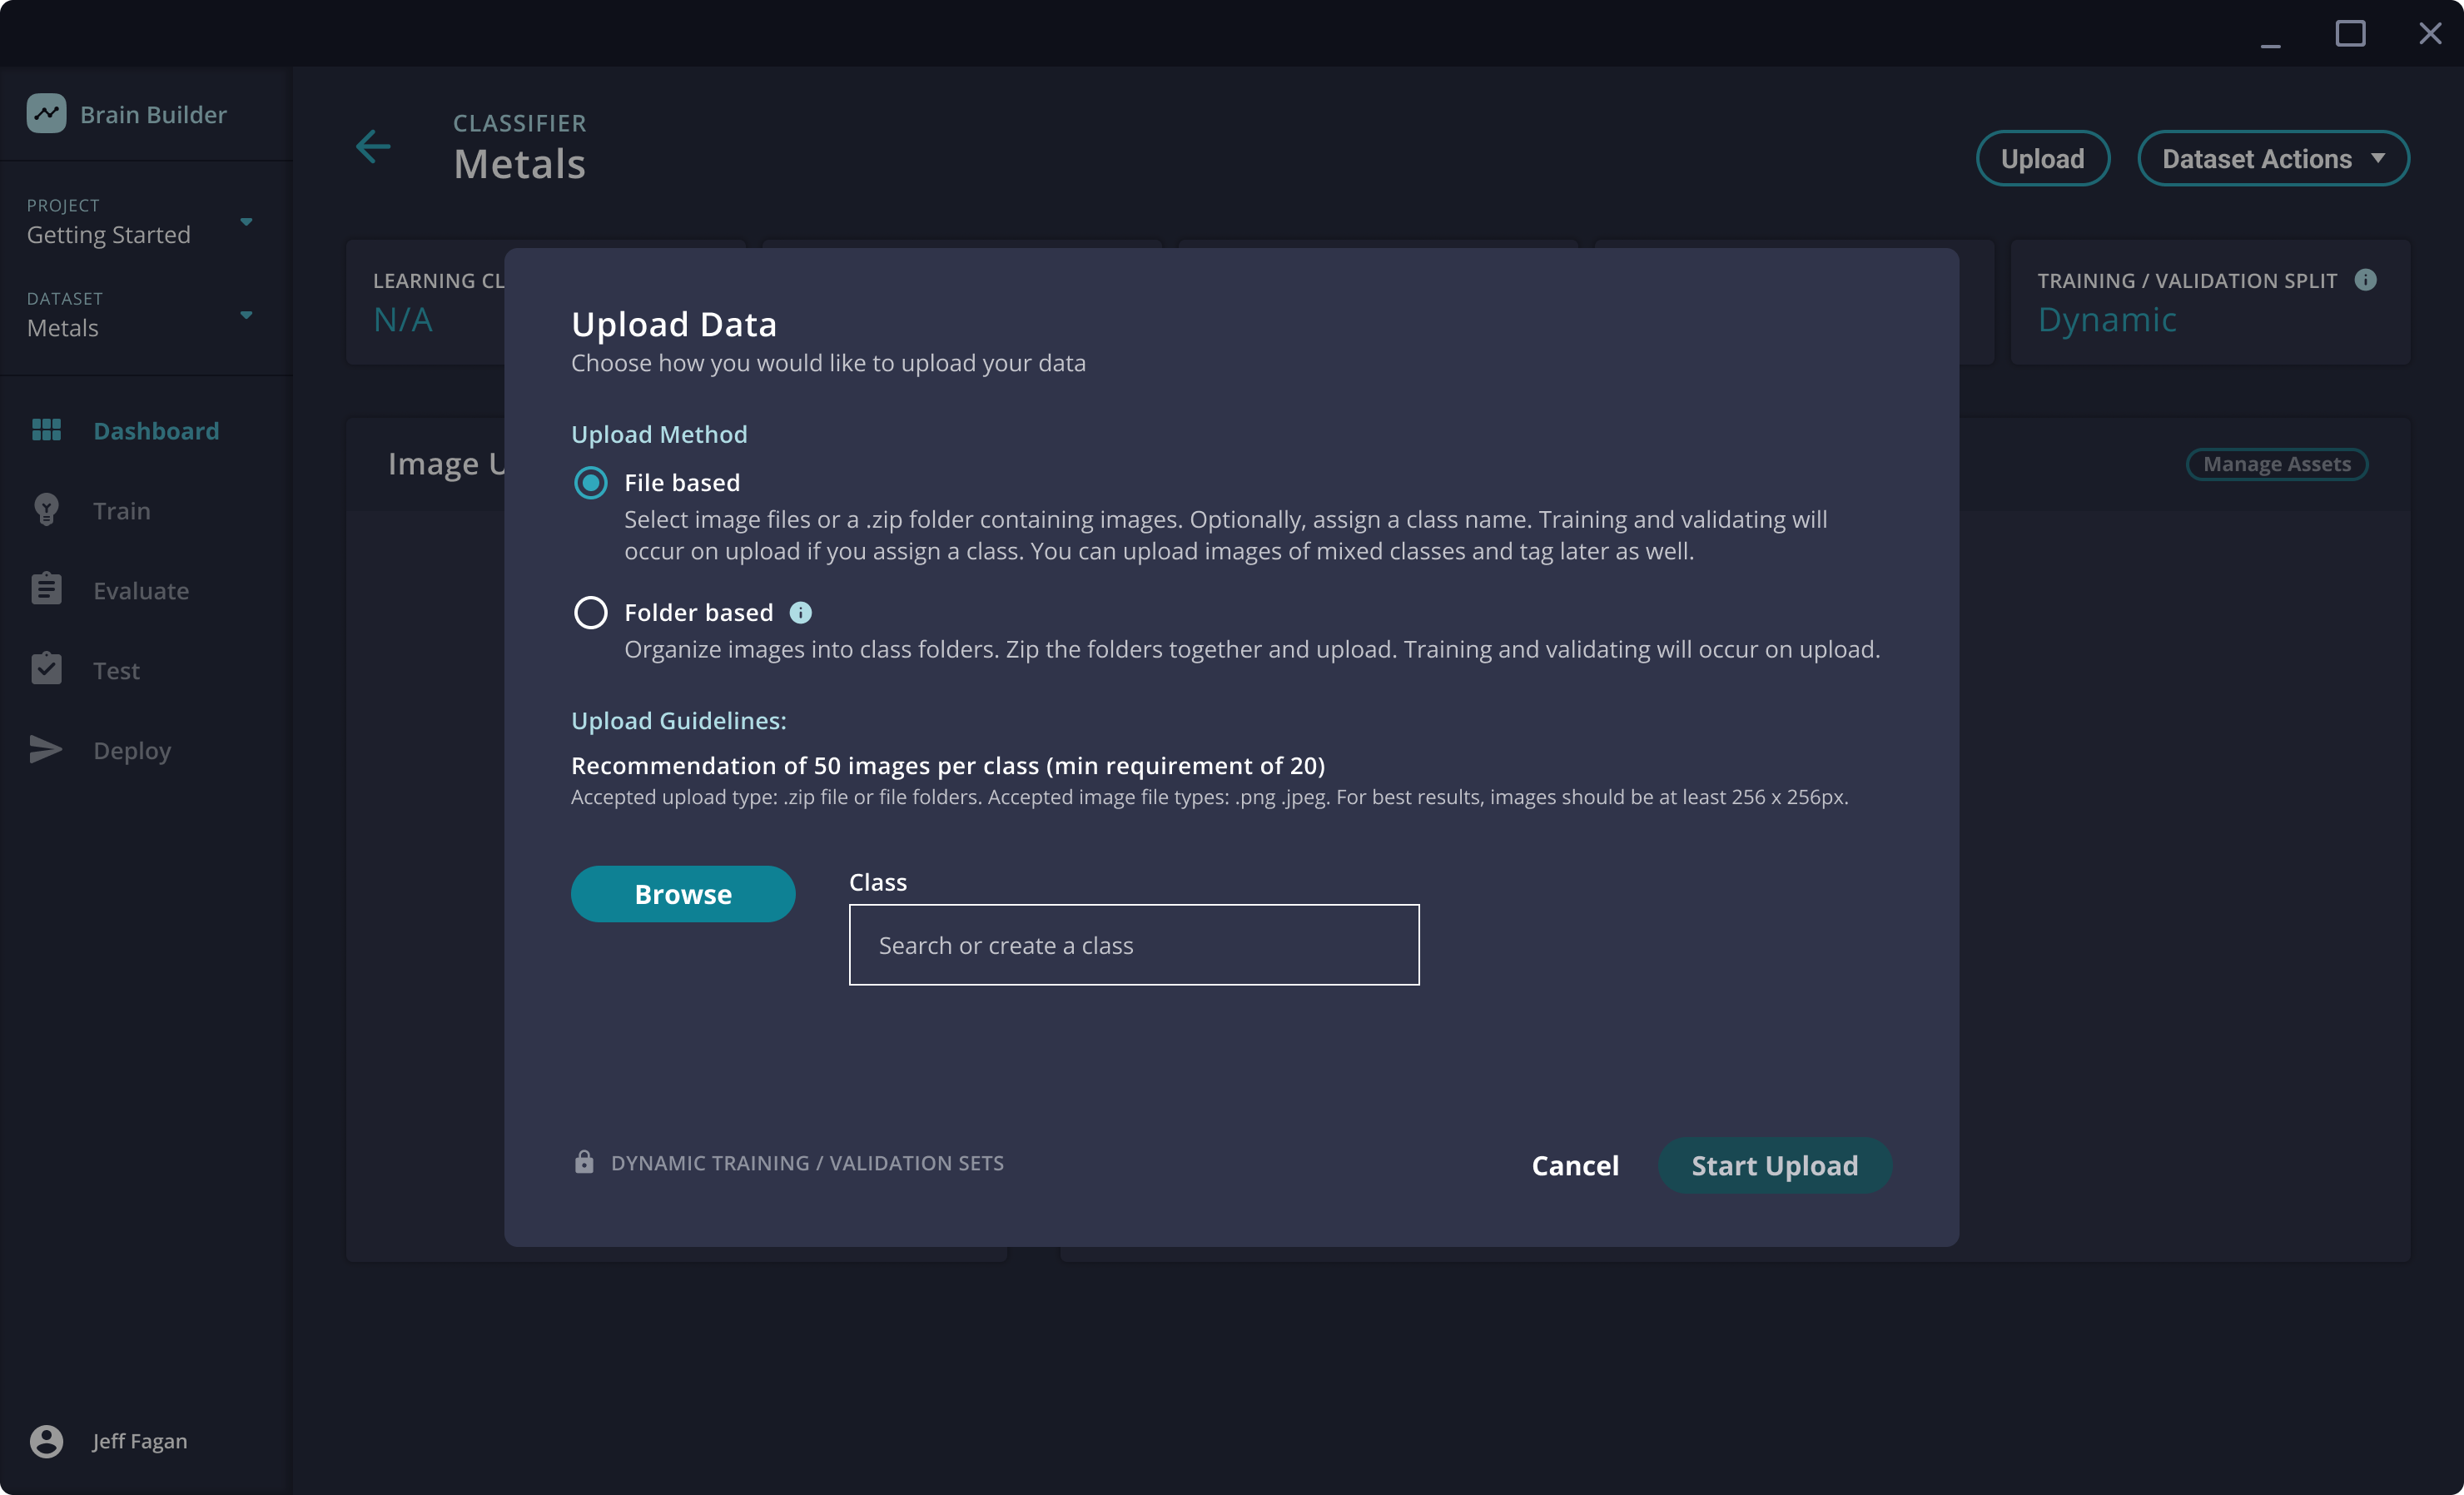
To use the file based upload method:
- Select the File based button on the upload screen.
- Click the Browse button. Use the file navigator to select one or more image files (or a zip file containing multiple image files) to upload.
- If all of the selected files are the same class, then a class name can be entered in the Class field (or the class can be selected from a drop-down for Anomaly Recognizers)
- When ready, click the Start Upload button. The images will be loaded into Brain Builder. If a class label has been provided, then the images and label will be used to start training the Brain.
Folder based upload
To use the folder based upload method:
-
Select the Folder based button on the upload screen.
-
Within the computer file system, organize the images into folders according to class. Each folder name should be the class that you want to use to label the images. Zip all of those images into a single file.
.zip-file -Class A -Class B -Class C -
Click the Browse button and use the file navigator to select the zip file. Click Start Upload. The images will be uploaded, labeled according to the folder structure, and used to train the Brain.
Advanced upload
Brain Builder also supports uploading images with a JSON file that specifies both the training/validation split and the class label for each image.
To use this, zip all of the image files with a JSON file named dataset.json, structured as follows:
{
  "type":"classification",
  "valSet":
  [
    {
      "label" : "baguette",
      "path" : "Baguette/baguette_14.jpg"
    },
    {
      "label" : "baguette",
      "path" : "Baguette/baguette_15.jpg"
    },
    ..
  ],
  "trainSet": [..]
}
The type value in the JSON file should be either classification or anomaly recognition. Images may be included in either the valSet or trainSet arrays with the metadata for label and path for each image.
To be uploaded and labeled using this method, images must be included in the zip file and listed in the JSON file. Any images that are not included in both will be skipped.
🔲 Uploading data - Detectors
There are two options to upload images for Detectors.
- To upload images without labels, simply select one or more images to upload.
- Brain Builder allows uploading of already-labeled images to train a Detector. This must be done using the standard KITTI annotation format. The annotation files and images should be uploaded together as a ZIP file.
Updated about 1 month ago